I shot the two images above for this demo while onboard our yacht tour a couple weeks ago. We weren't in perfect position for the composition I really wanted but pixels are free so I shot anyway. The eagles are separated from the mountain and glacier background by about 10 miles. I had a Canon 400mm f/2.8L on my 7D at the time and could not get both foreground and background in focus with the given focal distance. I decided to quickly shoot with eagle focus and again with glacier focus; the only thing that changed between shots was focal point. Although I was on a tripod the boat was moving so there was a slight shift in the images.
Once back in Lightroom I performed some basic optimization, selected both images, synchronized, right clicked, and chose the option shown below. If you are working Bridge, the same optimization and synchronization may be done via ACR. Select both images and then choose Tools-Photoshop-Load files into Photoshop Layers.
With a stack (a multi layer image in which each layer comes from an individual image) in Photoshop I needed to do some masking in order to selectively reveal and conceal each layer. I wanted the foreground from one image (with the eagles in focus) and the background from the other (mountain and glacier.) As always with Adobe I had at least three options: 1) I could add a mask to my top layer and then use a brush to paint. or 2) I could select the eagles and rock in the foreground and then add a mask (turning my selection into a mask.) or 3) I could let Photoshop do the work and Auto-Blend. The Auto-Blend option (Edit-Auto-Blend Layers)when set up as below uses contrast as a discriminant to build a mask.
There are two main "gotchas" with Auto-Blend. The first is if there is a shift in the images you might need to Auto-Align first. Interestingly, in this case Auto-Align did not work as the images were fairly different without enough common pixels to scene map. Second, to activate Auto-Blend as an option multiple layers must be selected. Use click + shift click functionality to select multiple layers.
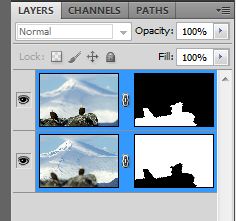
After the blend, Photoshop gave me the layer masks you see above. Not perfect but pretty good and extremely fast. I made a few more changes to the images in order to correct color and boost contrast in the background. I used a Curve adjustment layer for color correction and then stamped visible and set the resultant pixel layer to the Multiply blend mode with a reduced Opacity. I copied a layer mask from above in order to reveal the effect on only the background. To copy layer masks from one layer to another hold Alt (Win) / Opt (Mac) and click, hold, and drag a layer mask.
I also wondered what the image might look like with only one eagle so I removed the bird on the left. To do this I first selected the left most eagle with the Quick Select Tool and then Filled using Content Aware Fill. This did most of the job but left a few places to touch up with the Healing Brush and Clone Stamp. Finally, I cropped a bit differently.
In the end, the eagle is too centered for my taste. Normally the center is deadly (As Rick Sammon likes to say.) Potentially, an argument could be made that the extended depth of field allows the viewer to leave the centered eagle and explore the in focus, interesting background. Regardless, I think this image will only serve as a demo.
Fiat Lux!


