Rick Sammon: Color Efex Pro Tip

I photographed the “Official Parking Man” of Old Havana, Cuba. I like the straight shot, but I wanted to remove some of the reality from the scene, which is another advantage to using plug-ins. When we remove some of the reality from an image, our pictures can look more artistic and creative.

In Nik Software's Color Efex Pro
Filter: Bleach Bypass

Effect: Intensifies an image by creating a greater difference between highlights and shadows. Adds bold tones to an image.

Filter Tip: Experiment with Saturation settings. As with many effects, less is often best, as I found with this image. This effect works well with images that have fine lines.

Photo Tip: Keep in mind that people don’t always need to be looking directly into the camera when you take their portrait.

​And check out Rick's new iPhone/iPad app with 50+ tips on using Nik's Color Efex Pro.

Before

Before

After

After

Rick Sammon's New iPhone/iPad App!

​The amazing Mr. Sammon has just released a new app for the iPhone & iPad that is like an interactive eBook. If you wanted to know how to get the most out of Nik Software's Color Efex Pro, this app is for you. And it's an absolute STEAL at $0.99! Jump over to the app store today and check it out!

More info on the app on Rick's site HERE.
Buy in the App Store.​

Parish Kohanim and the Dynamic Figure

Parish Kohanim has been successfully involved in the photography industry for over 25 years. Working commercially for a large portion of his career, Parish has shot for advertising agencies, design firms and Fortune 500 companies including IBM, AT&T, DeBeers, and Coca-Cola. His work has also been published in Vogue, Harper's Bazaar, Forbes, Time and Newsweek. 

In recent years Parish has turned his focus towards fine art photography, creating stunning imagery using figure and dance including projects with members of Cirque Du Soleil. 

We are happy to have Parish Kohanim joining our incredible team of instructors at this year's California Photo Festival, October 12-16, 2011. Parish will be teaching a number of workshops including Creating Dynamic Figurative Shots and What Makes a Portrait Successful.

Here's what Parish has to say about the California Photo Festival....

Why do you look forward to teaching at the California Photo Festival?

"I am looking forward to meeting participants of the workshops who share the same passion for photography that I do. I continually search to find exciting and diverse perspectives of the world around me, evolving and expanding my vision and that is what I want to share with the class."

Why will students enjoy participating in your workshops?

"It is exciting to push all of the workshop participants, as well as myself, not only to see differently, but to shoot in new ways, breaking not only my comfort zone, but every one's in the class. We will find ordinary objects and make them extraordinary through our vision."

Join Parish at this year's California Photo Festival to learn the latest tips and techniques from a portrait and fine art photography master!

Learn more about Parish at ParishKohanim.com. To see all of Parish's events during the California Photo Festival click here! Also, take a look at thesegreat videos showing Parish at work in his studio and get a feel for what you can learn from this talented photographer. Parish will also be giving a free and open to the public 

Explorer of Light presentation, Wednesday, October 12th from 3:30 - 4:45pm at Embassy Suites in San Luis Obispo, as part of the California Photo Festival and sponsored by Canon.

Why Jennifer Wu Loves the California Photo Festival!

Canon Explorer of Light, Jennifer Wu, is an amazing instructor and has taught many workshops here at Light. She will also be joining us for a second year at the California Photo Festival, October 12-16, 2011!

Jennifer has shared her reasons why she can't wait for another year of teaching at the California Photo Festival and why you should join us for this incredible event!

Why do you enjoy teaching at Light and the California Photo Festival?

"I love teaching workshops at Light Photographic Workshops and the California Photo Festival. The facilities are great but even better is the supportive environment. We have fun and get in lots of great shooting as well."

Why should students join us for the California Photo Festival?

"The California Photo Festival is a blast. There is so much going on with plenty of interest for all types of photography. I have a great time leading the field workshops and giving the lectures. There is something for everyone at the event with so many different instructors who cover portraits, digital imaging and processing, wildlife and of course my favorite, landscape photography."

​Image by Jennifer Wu.

​Image by Jennifer Wu.

Taken while teaching a workshop at LIGHT Photographic Workshops. Click here to see a list of all of Jennifer's classes happening during this year's California Photo Festival. 

Jennifer will be on display at the Epic Light Gallery at LIGHT Photographic Workshops starting September 30th. As well as teaching our Print Perfection workshops with Hal Schmitt and Barbara Ellison October 6-9, 2011.

Learn more about Jennifer by visiting JenniferWu.com

As the California Photo Festival quickly approaches we are getting more and more excited about hosting the largest photography event on the Central Coast!

If you would like to join us for the 2nd annual California Photo Festival this October, sign-up today at CaliforniaPhotoFest.com!

Fiat Lux!

Why Rick Sammon Loves Working with LIGHT!

Recently we have spoken with several of our guest instructors about why they decide to come back to the Central Coast and teach at Light Photographic Workshops. 

Canon Explorer of Light, Rick Sammon, is a popular guest instructor here at LIGHT, as well as our Keynote speaker for this year's California Photo Festival. Here are his thoughts on why he enjoys teaching at Light Photographic Workshops and why you'll enjoy attending one of our fantastic digital photography classes. 

Why do you enjoy teaching at Light?

"I enjoy teaching at Light for three reasons: One, the picturesque setting is ideal for creative photographers. Two, the students are dedicated to serious learning and serious fun (we have a lot of fun after hours). Three, I learn from the other instructors."

Why do you think students will enjoy learning digital photography at Light?

"Light offers a unique combination of shooting in a wonderfully peaceful setting that gets the creative juices flowing. What's more, the small class size is unique among workshops."

​Image by Rick Sammon. 3 shot HDR

​Image by Rick Sammon. 3 shot HDR

Shot with the Canon 5DII and Canon EF 15mm Fisheye lens. Taken during the "Exploring the Light" workshop at LIGHT Photographic Workshops.

We're happy to have Rick Sammon joining us for this year's California Photo Festival, October 12-16, 2011! 

Rick will be teaching a variety of topics including HDR, Social Media Marketing, Lighting and more. Click here to see the full list of Rick's festival events!

Learn more about Rick at RickSammon.info

Visit CaliforniaPhotoFest.com to see our incredible line-up of instructors and all the events happening at this year's California Photo Festival!

The California Photo Festival- Don't miss the biggest photography event on the Central Coast!

Get your pass now to the 2nd annual California Photo Festival, October 12-16, 2011!

This year will be better than ever with 17 world class instructors, awesome hands-on learning, and the beauty of the Central Coast.

Our incredible line-up of instructors includes Rick Sammon, Hanson Fong, Rob Sheppard, Jennifer Wu,  David H. Wells and Hal Schmitt.

Click here to see the full line-up of instructors.

With 170+ events during the week we have something for every level of photographer, from shooting horses on the beach at sunset to mastering indoor lighting techniques.

Click here to see the full schedule of events!

Get your pass before August 30th and pay only $449 for all 5 days of the festival with our Early Bird discount. Use discount code "earlybird2011" to take advantage of this killer deal.

Visit CaliforniaPhotoFest.com or call the office 805-528-7385 for more details.

Fiat Lux!

A Shooting Tip from Jennifer Wu!

Photographing Water in Motion|
by Jennifer Wu (Canon Explorer of Light)

Vertical water f/16 Shutter speed .6, ISO 100. I used a polarizing filter.

Vertical water f/16
Shutter speed .6, ISO 100.
I used a polarizing filter.

Photographing moving water at varying shutter speeds will offer different looks, from the silky to having detail and texture. When photographing the ocean surf, waterfalls, streams or any moving water, I would consider bracketing the shutter speeds for a variety of results.

In the vertical photographic example of a waterfall in Iceland provided, the water features a smooth, silky looks. In the horizontal image of the same waterfall, the water presents more detail. I like both effects, so I vary the shutter speed to get more or less detail. I recommend bracketing the shutter speed and reviewing the image on view screen to judge the results. If you see silky water with no detail where it is all white, then use a faster shutter speed. If there is too much detail, use a slower shutter to create the velvety water effect.

Horizontal waterfall: f/16 Shutter speed 1/10, ISO 100. I used a polarizing filter.

Horizontal waterfall: f/16
Shutter speed 1/10, ISO 100.
I used a polarizing filter.

Shutter Speed Choice: The water flow will be fast with a large waterfall and slow with little stream, so the shutter speed will vary for each scene. In addition, depending on the focal length of the lens, it will provide less motion (wide angle) or more motion (telephoto).

I photographed the waterfall in Iceland while leading a photography tour in the horizontal image has a .6 second shutter speed for a satiny effect, while the vertical has a 1/10 shutter speed to get more detail.

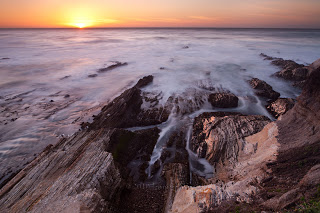
In another example, the ocean images have a 10 second exposure to create the smooth look of the ocean surf.

In Yosemite, I use around 1/125 of a second for having some detail in the powerful, fast moving waterfalls yet 1/15 to 1/30 of a second for smooth streams in the valley.

Tripod: Using a STURDY tripod will be necessary for the slow shutter speeds. It is still a good idea for higher shutter speeds, as it will help with fine-tuning the final composition. Keep in mind it is often windy at the base of a waterfall or around the ocean surf.

Exposure: when taking a photograph, I decide whether the shutter speed or f/stop is the most important and set that first. Normally, I use manual mode and set the shutter speed then set the f/stop I want for the scene when photographing moving body of water as that is the most important. Next I would set ISO. I would use the native ISO for the camera, such as ISO 100 for Canon, or 200 for Nikon. If the shutter speed is too slow, I would raise the ISO to the proper exposure. Finally, I would use a filter, as discussed below.

Shutter Speed: In order to get slow shutter speeds for the satiny effect, try photographing in low light conditions as full sun maybe to too strong for slow motion. For example: photograph at low light near sunrise or sunset on sunny days, with the subject it by the first or last rays of light or when the water is in the shade. That can be on an overcast day or after sunset or before sunrise.

Filters: Using a polarizer will reduce your shutter speed time by about two f-stops. Turn the polarizer to see the effect on shinny rock surfaces. Be careful when using a polarizer so as not to take out desired colorful reflections. Neutral density filters, grey in color, will reduce the light to the sensor, allowing for a slower shutter speed.

Ideas: Some ideas include waterfalls, streams, cascades, ocean surf or a lake in stormy weather. I like photographing streams in the shade with green leaves reflected onto streams in the afternoon (Yosemite’s Fern Spring is good for that). I like to photograph along Yosemite’s Merced River at sunrise to get the warm reflections of the mountains in the river. Fall colors are another good one to look for.

​Morro Bay rocks and surf, F/16, 10 seconds, ISO 100. I used a 3-stop neutral density filter and a polarizer.

​Morro Bay rocks and surf, F/16, 10 seconds, ISO 100. I used a 3-stop neutral density filter and a polarizer.

The ocean examples were photographed during a Light Photographic Workshop I lead earlier this year. I will be going out to the same location, leading field workshops for the festival. I can’t wait! Hope you have fun photographing moving water and creating inspiring images!

​Morro Bay sunset, F/16, 13 seconds, ISO 100. I used a 5-stop neutral density filter.

​Morro Bay sunset, F/16, 13 seconds, ISO 100. I used a 5-stop neutral density filter.

We are proud to have Jennifer returning to the California Photo Festival October 12-16, 2011!

Jennifer will be joined by fellow Explorers of Light Rick Sammon, Hanson Fong, Parish Kohanim and more!

See all of our 170 + events by visiting CaliforniaPhotoFest.com!

Set Specific Goals: A Tip from Rick Sammon

In photography (as well as in life, of course), it's very important to set goals. If you don't set goals, how do you know where you are going?

Here is an example of what I mean.

While teaching a private workshop in Mongolia, the student and I had the opportunity to get the shot that every horse photographer wants to get: a shot of the horse with all the hooves off the ground.

To get the shot, I told the student that we had to (and you can use these tips when photographing fast-moving subjects):

1) Set our Canon 5D cameras to the AI Servo focus mode - which tracks a moving subject right up until the moment of exposure.

2) Choose the rapid frame advance mode.

3) Compose the scene (using our Canon 100-400mm IS lenses) with lots of space around the subject – so no important parts were cut off.

4) Choose a shooting position where the light was just right.

5) Carefully watch the background so that the subject was completely isolated.

6) Take several series of images to ensure at least one good shot.

7) Use a shutter speed of at least 1/000th of a second to freeze the action.

8) Shoot with both eyes open - so we could see if something was coming into the frame that would ruin our pictures.

9) Check all our camera settings (ISO, Image Quality, white balance, etc.) to get the best possible in-camera exposure.

• • •

Setting the specific goal beforehand, and going through the motions of taking the shot in our hotel rooms, we became comfortable with the process. When we got on site, we practiced the process again and again - before the show.

All our practicing made getting the shot relatively easy - again, because we set a specific goal.

So . . . I told this story to my students while teaching a workshop at the LIGHT Photographic Workshops in Los Osos, CA. The next day were were going to photograph horses running on the beach.

Guess what? They all set goals . . . and they all got the shot.

Set specific goals, and you'll have a better chance of getting the shots you envision in your mind's eye.

Explore the light,

Rick Sammon
RickSammon.info

Don't miss seeing Rick Sammon and 4 more Canon Explorers of Light at this year's California Photo Festival.

Early bird pricing ends August 30th! Register today at CaliforniaPhotoFest.com