
Quick video tutorial showing how to make the HDR Prep preset Hal talked about in the Google+ Photo Focus hangout. Hal uses this before sending images to Photomatix Pro.
Workflow Demo - Silhouettes with LR, PS, and Clarity
Here is a quick demo of one of Hal's silhouette techniques using Lightroom, Photoshop, and Topaz Clarity. Good stuff even if you have not shot a silhouette yet!
Topaz DeNoise Webinar is Available on YouTube
My recent Topaz DeNoise webinar is available to watch on YouTube.
Enjoy.
Fiat Lux!
Denoise Video
A recent video showing my Topaz Denoise and Detail process.
Thanks for the questions that help generate these videos!
Fiat Lux!
Elephorm Universal Player FAQ - For Hal's Lightroom Tutorial
Backpack: Universal Player FAQ
We have received a lot of questions regarding how to use the Elephorm Universal Player with Hal's Lightroom videos. Here is the entire FAQ for the player with step by step description and images.
For those who might not be familiar Hal's Lightroom training is available via streaming video or you can download the content to your desktop/laptop. If you download the interface to play the videos is the Universal Player.
//
Currently, you can stream all of the videos on your idevices but the content is not downloadable there yet. An iOS app for iPad/Phone is almost ready though.
Thank you to everyone for providing the great feedback and reviews!
If you have not checked the training out yet, you can find it here
Universal Player FAQ

What is the Universal Player ?
If you have access to Internet, you can view our tutorials with no installation needed. But what if you want to train yourself on the train, the plane or in an hotel with sluggish internet access ? That’s when our Universal Player comes in handy. We’ve made a super simple to follow step-by-step.
Player installation
Connect to en.elephorm.com with your email and password, and locate the Universal Player Blob, as shown on picture below. Click on the Install button and follow instructions.

Player Login
After installation, the player will open automatically. You will then be prompted to accept the End User License Agreement (EULA) and to enter your details (same email and password you use to connect to en.elephorm.com)

Your library
You are now in your library, and you’ll be able to download your tutorials to HD in a few clicks.
- Click on the Arrow Icon on the right to initiate download
- On first Download, you’ll be prompted to choose a directory. We suggest you use the one proposed, and avoid external HDs. Once chosen, all tutorials you may download must go into the same folder.
- The flashing Arrow and the VOD label that turns into a HDD label means your videos are being transferred to your HD.
- If you see a VOD label next to the Arrow Icon, you didn’t downloaded yet, but can view as you would on the site, that is streaming.
Please move on to next section to understand what’s happening behind the scenes

Understanding the Player
NOTE
: To access the Lessons Summary shown in the picture below, you just have to click on the Chapter Access button in the Library.
A few things you should know:
- The player will download all the videos in a folder that should not be moved or renamed. You can choose which directory the folder will be created to, we suggest you should use the one first proposed.
- Some tutorials have 200 chapters, and an over 15 hours duration. It will take some time to download, so please plan ahead !
- The player downloads a maximum of 3 videos at a time, to save bandwidth. These three videos cannot be watched until completely downloaded (a progress bar shows download status, see picture below), all other videos, either downloaded or not can be viewed.

Still need help ?
Please feel free to contact us on en@elephorm.com !
LR 4 Local Adjustments - Adjustment Brush Example
A quick demonstration of an effective and efficient local adjustment workflow using Lightroom 4's Adjustment Brush feature to optimize Exposure and White Balance. Although Lightroom is the example software the exact same process is available in Adobe Camera Raw.
Fiat Lux!
GoPro + Lightroom 4 + P90X = Interesting Time Lapse
Just finished recording a tutorial about the LR 4 slideshow module and its timelapse functionality (part of a 14+ hour LR tutorial series). I am biased but the LR 4 series is without equal. Nothing like a little power yoga to relax afterwards. Thought I might try a timelapse with Lightroom 4, P90x, and a GoPro camera.
Heading south from Anchorage tomorrow for Sitka to meet the Northern Song, Rick Sammon, and the participants on our first eagle photo trip. Will put up a shot of the gear list I have with me tomorrow.
Fiat Lux!
P.S. Please no comments on the yoga form or lack thereof.
How to Get Rid of Chromatic Aberration / Jane Conner-ziser
Chromatic Aberration, in simple terminology, is when the
colors in a digital file do not line up correctly and you can see color
“fringing” around the edges of objects in your picture, mostly in places where
a dark object is next to a light one. This is caused when the lens fails to
converge all of the colors to a single focal point due to different wavelengths
– and it can be exaggerated if there is movement during the capture process.
Sometimes chromatic aberration occurs only in specific areas of a file, but sometimes, like in this sample, it occurs throughout the image and correcting it can become a big job!

SO, in this article I will share with you the most common options for getting rid of chromatic aberration, starting with the easiest; Adobe Camera Raw or Lightroom.
Both ACR and Lightroom have options in the Lens Correction Panel that address chromatic aberration.
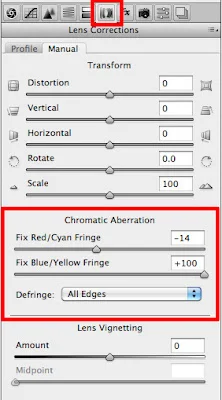
If the aberration is slight, all it takes is some visual adjustment of the sliders and choosing the defringing option that provides the best visual correction. Finite. Done – but it didn’t work on this image because the aberration is too severe.

The next option is to consider that the problem is that the color channels are not lining up correctly and perhaps there might be an adjustment that can be made in Photoshop to realign them. There are two options for this. The first involves opening the Channels Window, clicking on a color channel plus the visibility icon (eyeball) on the RGB channel and using the Move Tool to realign the color channels, matching the edges of your image.

This worked well in some areas, but not in others. It is possible to distort (transform) the separate channels … but you must keep in mind that image clarity is easily affected – which brings us to the second color channel option, changing the Image Mode to Lab Color first (Image / mode / Lap color) in order to separate the luminosity (detail and value) of the file from the colors. Once the adjustment has been made, return the file mode to RGB.
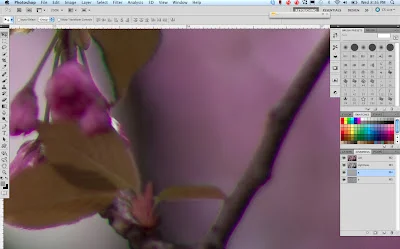
Unfortunately, this option didn’t do very well on this file either! We will be forced to take care of this the old fashioned way – correcting it by hand, one edge at a time. It’s going to take longer but the results will be perfect – here is how you do it:
Make a New Layer and change the Layer Blending Mode from Normal to Color. Choose the Brush Tool and set the opacity to 50%; use a small sized brush (this image was done with the brush size at 5 pixels, just large enough to cover the discolored edges). Hold down the Option (Alt) key to choose the neighboring color, then simply color over the one you want to change. Apply a few coats, reselect, and continue throughout the image. It is faster than you think and the results are worth it!

I dropped in a neutral gray layer under my paint and am showing the color layer in Normal Mode so you can see my work:
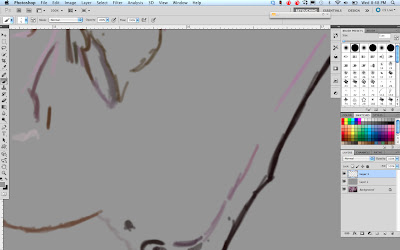
The total of my work looks like this:

And the detail looks like this:
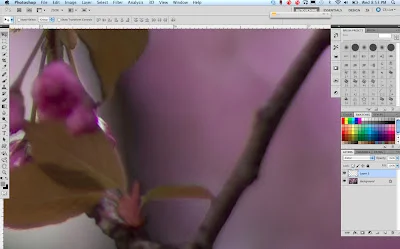
The job took just under an hour once I decided upon my strategy, and you can see how important it is to know your software! Options are important when you’re doing real world retouching because you want to get your work done as quickly as possible, but no two images are alike. Always start with the quick option, but learn a variety of ways of doing things so you won’t find yourself stumped on an important image that just has to be better.
This image was going to be printed as a 6 foot mural, part of a three image display with two other images that did not have the same problems as this one so it was really important that the work was perfect and would hold up to the enlargement. I’m so happy to say that everyone was pleased! Awesome!
Thank you for letting me share this project with you!
Jane Conner-ziser is an internationally recognized expert in ACR, Lightroom, Photoshop and Painter. She is an author, portrait retouching artist, painter and instructor living in Ormond Beach, Florida. She has been actively involved in professional photography for over 25 years. Contact Jane at Light Workshops lightworkshops.com or through her websites www.janeconner-ziser.com and www.jczphotographics.com
Best Methods for Cleaning Your Images
One of the most common gotchas we see in images and prints is the presence of spots. Regardless of the source such as dust on the sensor, every photographer should spot check their images before print, upload, email, delivery, etc. There are very few things that scream "lack of attention to detail" like spots in a finished image. At Light, we recommend spot checking every image at 100% or 1:1 view.
The best technique we have found to locate your spots is to use the Hand tool or a version of the Hand tool (other software) to slowly scroll through the image. Human eyes are very keen at detecting movement and this can help us find our spots. Many spots are very challenging to see on bright monitors when the photographer stares at the image. When you slowly scroll the image, dust spots appear to be moving against the background image.
This technique works extremely well. If you want to confirm a dust spot, wiggle the image with the Hand tool and the dust spot will jump off the screen at you. There are many instructors and photographers who recommend jumping through the image via keyboard shortcut. This is not nearly as effective as the scroll/wiggle method. Once you find your spots let the retouching commence (in a non-destructive manner, of course.) A common error with this method is to lose track of where you are in the image as you scroll. Use the Navigator to keep your bearings and you will easily check the entire image.
Fiat Lux!
Lightroom 4 Beta Quick Look
Adobe released the Lightroom 4 Beta earlier today and this video is a quick first look at the major changes in the program that relate to still photos. I used a fairly broad brush to cover the changes and will go more into detail as the Beta test progresses.
Unfortunately, not a single one of my main upgrade requests is included in version 4 of the program. Regardless, there are some interesting and useful new features and functions.
I think the new Book module will be very useful to many users. Adobe partnered with Blurb and it is now very simple to layout a photo book design. For those that do not use or have not used Blurb you can also export the book to PDF.
There is also a Map module for use with geo locating or geo tagging your images. It's pretty cool.
Inside the Develop Module, the Basic tab changed (more detail in the video), there are more options for local adjustments, and CA removal has been simplified (although I have not found it to work all that well.) Soft proofing was also added to the Develop Module for use in prepping an output file.
There are some very large changes to video handling and optimization. I did not have the time in this quick look to go through them. But if you do video, you will like them.
I will discuss more regarding the Beta soon.
Fiat Lux!
Happy New Year! (Time for a couple DAM changes)
Happy New Year from the crew at Light. Here is a quick video discussing a few changes we should all make to keep our Digital Asset Management process working smoothly.
Fiat Lux!
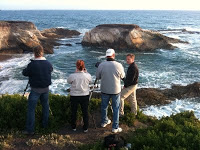
Blending Landscape Exposures with Marc Muench

This weekend we are happy to have Marc Muench here to teach Light students the latest tips and techniques in exposure blending. Last night we shot along the Bluff Trail in Montaña De Oro State Park to gather images for HDR processing.
The fog left us alone just long enough to get some great shots of the sunset.

Today we'll be using the images from last night to explore the different ways to blend multiple exposures together to create stunning High Dynamic Range images.
We hope to have Marc back soon for another awesome workshop.
There will be more HDR learning opportunities during the California Photo Festival Oct. 12-16, 2011. Check out our website LIGHTWorkshops.com to see the rest of our summer workshops.
Fiat Lux!
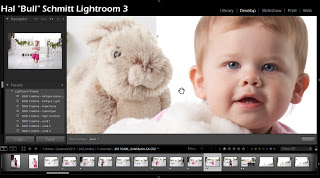
Lightroom in the House this Week

After three minutes in Lightroom

Raw capture straight from the camera
Our Lightroom 3 course is in full swing at Light. People are often surprised we offer a five day LR course and remark "What could you possibly talk about for five days?"
Lightroom is such a powerful program it will make your workflow as effective and efficient as possible, but only if you use all of the tools, tips, tricks, and techniques. To get a full understanding of the digital workflow and how each LR module, feature, and function applies takes some time. We have found five days is the perfect amount to go from total beginner to complete master. Interestingly, the same often applies to folks who have been using LR for years.
I have always thought much of Lightroom's power is in the Library Module. Most of the photographers we meet have some inefficiency when it comes to the first three stages of the digital workflow, Import, Edit, and Organize. This is where a strong understanding of digital asset management and Library functions come together to save the day. I find it this aspect so important I normally spend two full days with the Library Module ensuring everyone has a supreme grasp of its power. Only after the required legwork can we get to the fun and sexy stuff in the Develop Module.
Man cannot live in the lab alone so we will be out shooting tomorrow morning and for the rest of the week to build some source material and hone our workflow.
We did get to experience a fun little bug in Lightroom today though. Always interesting when the big demos do not go as advertised. Not sure whether this is new in 3.4.1 or was in 3.4 but will do a bit more troubleshooting tomorrow. Fortunately, the bug is a very limited scope issue. I do a demo Import of several files and rename the files in the process. The files I use have a combination of upper and lower case file extensions. If you happen to have "Leave as Is" selected in file extension on the import dialog-File Renaming tab, LR will not rename files with an upper case extension. This only seems to occur when the import source contains files with both upper and lower case extensions. So probably only applies to me in a few demos.
Fiat Lux!
Topaz Detail Webinar Replay
Here is the replay of the webinar I did with Topaz Detail a few weeks ago.
The mask process I quickly describe is available here.
Please send me any of your questions or comments to hal@Lightworkshops.com
You can find other Topaz webinars here.
Fiat Lux!
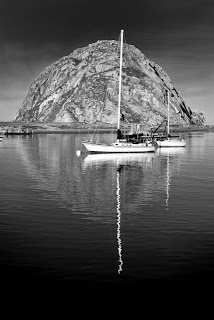
Composite Images for Easy Expanded DOF

I shot the two images above for this demo while onboard our yacht tour a couple weeks ago. We weren't in perfect position for the composition I really wanted but pixels are free so I shot anyway. The eagles are separated from the mountain and glacier background by about 10 miles. I had a Canon 400mm f/2.8L on my 7D at the time and could not get both foreground and background in focus with the given focal distance. I decided to quickly shoot with eagle focus and again with glacier focus; the only thing that changed between shots was focal point. Although I was on a tripod the boat was moving so there was a slight shift in the images.
Once back in Lightroom I performed some basic optimization, selected both images, synchronized, right clicked, and chose the option shown below. If you are working Bridge, the same optimization and synchronization may be done via ACR. Select both images and then choose Tools-Photoshop-Load files into Photoshop Layers.

With a stack (a multi layer image in which each layer comes from an individual image) in Photoshop I needed to do some masking in order to selectively reveal and conceal each layer. I wanted the foreground from one image (with the eagles in focus) and the background from the other (mountain and glacier.) As always with Adobe I had at least three options: 1) I could add a mask to my top layer and then use a brush to paint. or 2) I could select the eagles and rock in the foreground and then add a mask (turning my selection into a mask.) or 3) I could let Photoshop do the work and Auto-Blend. The Auto-Blend option (Edit-Auto-Blend Layers)when set up as below uses contrast as a discriminant to build a mask.

There are two main "gotchas" with Auto-Blend. The first is if there is a shift in the images you might need to Auto-Align first. Interestingly, in this case Auto-Align did not work as the images were fairly different without enough common pixels to scene map. Second, to activate Auto-Blend as an option multiple layers must be selected. Use click + shift click functionality to select multiple layers.
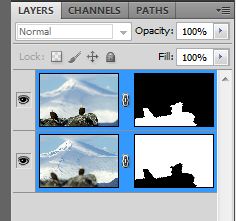
After the blend, Photoshop gave me the layer masks you see above. Not perfect but pretty good and extremely fast. I made a few more changes to the images in order to correct color and boost contrast in the background. I used a Curve adjustment layer for color correction and then stamped visible and set the resultant pixel layer to the Multiply blend mode with a reduced Opacity. I copied a layer mask from above in order to reveal the effect on only the background. To copy layer masks from one layer to another hold Alt (Win) / Opt (Mac) and click, hold, and drag a layer mask.

I also wondered what the image might look like with only one eagle so I removed the bird on the left. To do this I first selected the left most eagle with the Quick Select Tool and then Filled using Content Aware Fill. This did most of the job but left a few places to touch up with the Healing Brush and Clone Stamp. Finally, I cropped a bit differently.

In the end, the eagle is too centered for my taste. Normally the center is deadly (As Rick Sammon likes to say.) Potentially, an argument could be made that the extended depth of field allows the viewer to leave the centered eagle and explore the in focus, interesting background. Regardless, I think this image will only serve as a demo.
Fiat Lux!
Jack and Jane

Jack Davis and Jane Conner-Ziser are here this week with a Photoshop, Lightroom, Painter, and shooting extravaganza. I cannot say enough about this course. The amazing tips, tricks, and techniques from these two Masters are nonstop.
The multi-instructor workshop is an excellent opportunity to pick up two unique points of view for the entire digital workflow. To me one of the great things about photography is the ability to apply our creative vision to the shoot and after capture process. There are very few cookie cutter approaches when shooting and optimizing. Listening to two instructors, we are forced to accept and use multiple techniques and options to achieve the final image.

Jane Conner-Ziser fine tuning a pose
The attached shots are from a location shoot we did here in Los Osos. Jack and Jane are masters of light, posing, and composition. The shoot was an excellent break from the computers and a huge learning experience for all (also made some cool images.)

Jack Davis shooting (note big camera over shoulder and iPhone in hand)
We are back in the lab today hitting it again.
Fiat Lux!
Instant Polarizer Video Tip
Hal Schmitt is Coming to Las Vegas!

Hal is bringing his new seminar The Dynamic Duo: Lightroom 3 & Photoshop CS5 to Nevada!
In this one day event Hal will demonstrate the tips, tricks, and techniques of Lightroom revealing a streamlined but effective process to execute all stages of the digital workflow from import to output. Transitioning seamlessly from Lightroom to Photoshop (via the built-in functionality) Hal will demonstrate the beauty and power of the world’s finest image optimization software.
The course will be held at:
Morgan Stanley Smith Barney
701 North Green Valley Parkwa
Henderson, NV 89074
Admission is $50 at the door, but pre-register before March 11th and pay only $39! For more details call the office at 805-528-7385 or go online to LIGHTWorkshops.com
Fiat Lux!
Tip of the Week: Using Color Lables in Adobe Lightroom and Bridge
One of the most overlooked features in Lightroom and Bridge is the Color Label. Both programs offer five colors (red, yellow, green, blue, and purple) to assist you in managing and organizing your images. These colors may be assigned a specific meaning in your workflow and when assigned to an image you will have a quick visual reference to your image "types."

To assign a Color Label in Lightroom, highlight an image or images, position the cursor over the image, and right click. From the flyout menu select "Set Color Label" and choose one of the colors. You may also use the keyboard shortcuts of 6 (Red,) 7 (Yellow,) 8 (Green,) or 9 (Blue.) Unfortunately, no keyboard shortcut for purple. In the Bridge, select just as above and then right click. At the bottom of the flyout menu choose "Label" and pick the appropriate option. You will notice there are no color names but instead text assigned to a color. To customize, go to Edit-Preferences (Win) or Bridge-Preferences (Mac) and select "Labels" from the menu. First uncheck the box at top to enable single stroke keyboard shortcuts the same as above then enter a meaningful description for each color.
You can use the Color Label anyway you prefer; as an example here is my system. Red = High Priority Yellow = Web Green = HDR Blue = Stitched Pano Purple = Expanded DOF
Join our newsletter to get more tips from the crew here at Light!
Fiat Lux!
The Beauty of the Virtual Copy (No Pixels were Created or Harmed in the Making of this Post)

Original
One of my favorite things about Lightroom is the Virtual Copy feature. Referencing the same source file (negative file) Lightroom allows the user multiple versions of an image. Even better, since the whole process is procedural (very simply, no pixels pushed) this can be accomplished quickly and without much additional storage space or processing power required.
Fake Infrared Preset
To create a Virtual Copy, select any image (if multiple images are selected ensure the image you want to "copy" is active) and then right click with your pointer over the image thumbnail. From the flyout menu choose "Create Virtual Copy." You could also use the keyboard shortcut of CTRL (Win) / CMD (Mac) + '.
The Virtual Copy (VC) will appear immediately after the original preview and is automatically stacked. The VC is easily identified by the upturned page effect on the lower left corner of the Grid View or Filmstrip thumbnail.

Fake IR with Color Preset
To experiment with another version send the VC to the Develop Module and optimize again with different settings. This is a great way to play around and find other solutions to creating images with drama, impact, and wow factor. To push even further, make multiple Virtual Copies and optimize as many ways as you can dream up.
The series of images on this page were created very quickly by copying the original (at the very top) three times and then applying the following presets: Fake Infrared, Fake Infrared with Color, and Fake HDR. I will talk more about these presets and show the settings in future posts.

Fake HDR Preset
2011 schedule is filling up and will be completely posted soon. Hope to see you here or at the California Photo Fest in October.
Fiat Lux!