Guest Blog! Flower Photos Beyond the Macro Lens

by Rob Sheppard

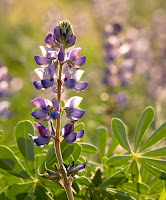
For Southern California where I live, spring is here and flowers are blooming. California as a whole has a very long spring compared to Minnesota where I grew up. Flowers can be found year round in many areas, plus a true spring in terms of flowers starts at the end of January and doesn’t end until June.

Flowers are such a great subject, too, because they are beautiful and they never run away from you or complain about having their picture taken! We are going to have a great field workshop to explore flower photography this April at LIGHT, and it will also include very practical work in Lightroom and critiques.

One of the first things many photographers think is that they must have a macro lens to do flower photography. While a macro lens can do many good things, it can also be very limiting for flowers because it is just one focal length.

I use focal lengths from 10mm fisheye to 400mm telephoto for flowers (I shoot APS-C format; for 35mm-full-frame, equivalent focal lengths would be 15mm fisheye to 600mm telephoto; for Four Thirds, this would be 8mm fisheye to 300mm telephoto). With the two California poppy photos seen here, I used a 10mm fisheye and a 200mm telephoto. With the yellow black-eye susan flowers, I used a 16mm wide-angle, and for the white thistle, a 400mm telephoto. I focus close in three ways: I look for lenses that focus close on their own, I use extension tubes, and I use achromatic close-up lenses.

Extension tubes are just that, empty tubes that extend the lens away from the camera body (you do want the kind that connect the camera electronics to the lens electronics, though). That allows any lens to focus closer. How close you can focus depends on the focal length to extension tube size. Wide-angle lenses need minimal extension to focus very close (usually you will find it difficult to use extension tubes for lenses wider than 24mm), while telephoto lenses need more. You can get a set of Kenko auto extension tubes for almost any camera brand, and I find they work well.

Achromatic close-up lenses are highly corrected close-up lenses that screw onto the front of your lens. Canon’s achromatic close-up lenses are best known – the 500D and 250D. I have a 77mm 500D that is big enough to be used with a wide-angle lens, plus I can use adapter rings to fit it to smaller diameter lenses.

Either extension tubes or achromatic close-up lenses can make all of your lenses act like macro lenses in terms of close-focusing. Results can be quite remarkable, though the quality can only be as good as the original lens. One thing you may find is that some lenses do well up close, and others do less well, and you cannot predict this by the price of the lens.

I love to use telephotos to isolate a flower and make it stand out against a soft, beautiful background. To do that, I will often shoot wide-open for f-stop – don’t be afraid of your wide f-stops such as f/2.8, f/4. f/5.6. Telephotos also compress distance and make a group of flowers tighter and more dense. They can also enlarge a portion of the background to make it work better behind your subject.

I love wide-angles for close-ups because now I can emphasize the environment of the flower. You now get in really close to the subject, and I mean REALLY close. Often I suggest photographers set their wide-angle to its closest focusing distance, with or without an achromatic close-up lens, and then move in until the flowers are in focus to really see the possibilities here. This forces you to get close.

A wide-angle up close makes the background smaller, yet more noticeable. It can be challenging to use because of that, but on the other hand, that is exactly what makes this type of shooting interesting. Depth of field is always greater so even out-of-focus areas are recognizable. Finally, perspective is stretched out so that flowers look like they are spread apart more. That can offer some very interesting opportunities for compositions that stretch back into the distance.

Come see Rob this spring and learn these techniques and more at his Springtime Flowers and Lightroom workshop April 24-28, 2013.​

Rob's free e-book, A Nature Photography Manifesto, is now available for the iPad or as a PDF e-book for any other computer. You can find the iPad interactive version at the iBooks Store. There are also links to both versions at www.robsheppardphoto.com/books.html.

High Angle Shooting Tip!

By Rob Sheppard

Did you ever see the photos of Ansel Adams standing on top of his car? He had a platform built that allowed him to set up a camera and tripod on his car to gain some height. A challenge we often face when photographing landscapes is that we are too low. Too low means we have to shoot through foreground stuff that is distracting or we can't get a good perspective on the scene. We can't get above important objects so they become truncated and we cannot show their real relationship with the scene.

The obvious answer is to get higher. You can see the difference in these two shots from Death Valley showing a creosote bush in the Eureka Dunes area. You would not think that the main bush is the same one! The first shot is from a high camera angle, whereas the second one is shot from standard tripod height. The first shot gives an interesting foreground to background relationship that shows how the creosote bush fits into this landscape. The second is hardly worth considering because the bush is too high in the landscape. (The green of the creosote bush is better in the first image because I used Viveza 2 on that image, but not on the second.)

So how did I do this? Did I drive a truck onto the dunes? Bring a big heavy ladder with me? Nope. I used my tripod, but in a unique way that works very well with digital photography.

I extended the tripod legs to their max, then brought them together. I set the self-timer of the camera to 10 seconds, set up my exposure and focus appropriately (in this case, aperture priority and auto focus), pressed the shutter, then hoisted my camera on tripod over my head. I held it until the shutter released, then brought it back down.

The great thing about digital for this technique is that you can instantly see what you got and make revisions. You may need to hold the camera straighter, aim a little higher or lower, and so forth. In just a few shots, I had my shot. (I did have to do some minor cropping for a slight straightening -- it can be hard to get the camera perfectly level when doing this, but then the Crop Tool in Lightroom makes this easy to fix!).

Obviously, you have to watch your shutter speed doing this or risk unsharp images due to camera movement during exposure. With a wide-angle lens, you can shoot at a slower shutter speed and still get sharp images, though this is inherently an unstable camera position, so you can't go too low. With a wide-angle like this, it is easy to use f/8 or f/11 to allow a faster shutter speed, plus I will use a higher ISO as needed, too.

So the next time you are in front of a landscape that is giving you problems, try hoisting your camera overhead! It can be worth a try just to see what the landscape looks like from up there.

This last picture includes a shadow of me hoisting that camera overhead to get some unique views of the tufa formations at Mono Lake that actually show Mono Lake as part of the scene.

-Rob Sheppard
www.robsheppardphoto.com

blog at 
www.natureandphotography.com
robsheppard@earthlink.net

This Week's Tip from Rob Sheppard!

A Difference in Seeing

One of the things we do very well is see all sorts of detail in a scene in nearly any light except when it gets very dark. So as photographers, it is very easy to see the subject.

Unfortunately, the camera does not work that way. The camera sees and emphasizes light and contrast. This different way of seeing is a challenge we all face as photographers. Often photos are unsuccessful because what we see and what the camera sees are two different things. We want the camera to see the subject as we do, but it doesn't.

​Image by Rob Sheppard © 2011

​Image by Rob Sheppard © 2011

A good way to see what the camera is seeing is to focus on light, not on subject. That does not mean you don't think about the subject -- that is only what gets you started. Then you try to photograph the light. That makes me remember a really eye-opening exercise, too. Go out for an afternoon and photograph the light and its effects, including shadows. Don't photograph "subjects" at all, just light.

It also helps to check your LCD and see what is emphasized -- the light helping your subject or the light fighting your subject. Remember that bright areas in a composition will always attract a viewer's eye and so they can be very distracting if in the wrong place.

​Image by Rob Sheppard © 2011

​Image by Rob Sheppard © 2011

Finally, realize that sometimes you just have to say "no" to a subject in a particular light that just will not work. As Steve Jobs said once, "It's only by saying no that you can concentrate on the things that are really important."

-Rob Sheppard

For more of these great tips from Rob check out the new iPad app "Rob Sheppard's Digital Landscape" developed by our very own Juan Pons! Based on his recent book "The Magic of Digital Landscape Photography" this app delivers essential tips on how to capture better landscape photographs and is paired with fantastic imagery.

Rob also has a great new eBook "Selling Photos" available for download through the Kindle Reading app (can also be download to your home computer or laptop)

Rob Sheppard and Juan Pons are both part of our incredible line-up of instructors at the California Photo Festival, October 12-16, 2011. See who's coming, the schedule of our awesome events, and last year's highlights at CaliforniaPhotoFest.com

The California Photo Festival- Don't miss the biggest photography event on the Central Coast!

Get your pass now to the 2nd annual California Photo Festival, October 12-16, 2011!

This year will be better than ever with 17 world class instructors, awesome hands-on learning, and the beauty of the Central Coast.

Our incredible line-up of instructors includes Rick Sammon, Hanson Fong, Rob Sheppard, Jennifer Wu,  David H. Wells and Hal Schmitt.

Click here to see the full line-up of instructors.

With 170+ events during the week we have something for every level of photographer, from shooting horses on the beach at sunset to mastering indoor lighting techniques.

Click here to see the full schedule of events!

Get your pass before August 30th and pay only $449 for all 5 days of the festival with our Early Bird discount. Use discount code "earlybird2011" to take advantage of this killer deal.

Visit CaliforniaPhotoFest.com or call the office 805-528-7385 for more details.

Fiat Lux!

Magic of Wildflowers with Rob Sheppard now only $595!

Rob Sheppard is coming back to Light April 11-15, 2011 to teach you everything you need to know about creating beautiful and unique photographs of the Central Coast wildflower bloom!

We've just lowered the price for our Magic of Wildflowers workshop from $895 to just $595!

This class is one of our favorites and now we're offering it for a killer deal. This offer is only good for 1 week, so get your spot before March 18th!

You can register online at LIGHTWorkshops.com or call the office 805-528-7385.

Fiat Lux!