• Home
  • Hal and Victoria Schmitt
  • Contact
  • Blog
Menu

LIGHT Photographic Workshops

Street Address
Templeton, CA 93465
805-550-4274

Your Custom Text Goes Here

LIGHT Photographic Workshops

  • Home
  • Instructors
    • Hal and Victoria Schmitt
  • Info
    • Contact
    • Blog
20110327_MdO_Poppy-64.jpg

Blog

LIGHT Photographic Workshops blog discusses everything photography related. Adobe updates, computer suggestions, accessories that can save your life and more!

Auto Focus Sensor Placement for Action

October 23, 2013 Hal Schmitt
Juvenile bald eagle photographed in Alaska.

Juvenile bald eagle photographed in Alaska.

A few years ago, I learned a technique from Rob Sheppard to make sure the critical part of my subject is in focus.  He suggested focusing precisely on the part of the image that must be sharp.  From that starting point, I could then calculate depth of field (DOF) and determine what additional parts of the image would be acceptably in focus.  In practice, I could also use the DOF preview button and see it real time.  This technique is great for every type of photograph I make.  It is sometimes a bit challenging though when photographing action.

In the example image, the eagle's eye must be sharp so it makes sense to focus precisely on the eye only.  I can make that happen by selecting a single auto focus (AF) point, placing it on the eye, and tracking the bird as it flies from right to left, easier written than executed when the bird is moving very quickly. 

AF_single.jpg

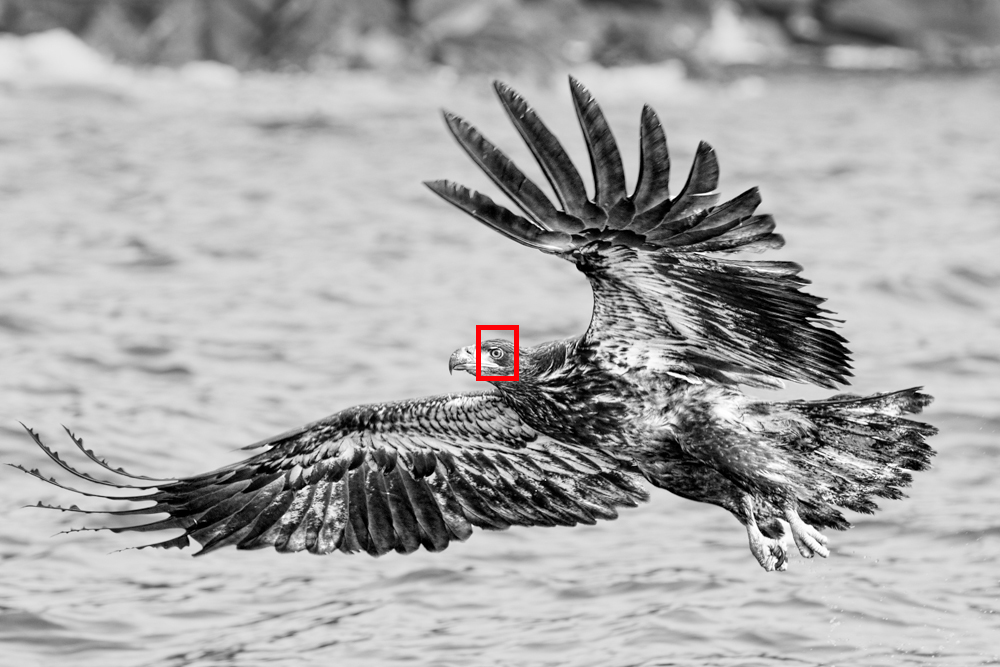
Since this can be difficult, many photographers choose to use a zone AF system in which multiple AF points are active.  As long as the subject is under one of the active points focus is normally achieved.  This technique works well as long as there is sufficient DOF to cover from the point of focus (as determined by the zone) and the critical part of my image.

Looking at the example eagle again, notice the left wing tip is not sharp.  The shutter speed of the shot is 1/1250th so motion blur is not the culprit, lack of DOF is.  This demonstrates where the zone technique can hurt you.  If the zone had "locked" onto the outer portion of the left wing it would be sharp, but the critical area, the eye, would not be.   Fortunately, for this image I knew I had shallow DOF and needed to precisely place my single AF point on the bird's eye.   

So what should you do in the field, single or zone?  Single is much more challenging but it always works. The zone is much simpler but DOF can be an issue.  I use both methods but before I shoot I calculate my DOF with a  smart phone or tablet calculator.  This way I begin the shoot with the information that allows me to choose the appropriate AF technique. 

Approaching each action shoot whether birds, horses, or people, I follow the checklist shown below and always calculate my worst-case DOF so I know if I should use a single point or the zone. 

Action.PNG

More info on this checklist and many others may be found at the following link.

Checklists

Of course making the choice between zone and single point is just one part of the process fpr action photography.  You must also practice your focus actuation technique, support, tracking, and exposure modification.   

Very few eagles where I am in California so I practice on any and every bird I can find.  If there are no birds around I make do with anything in the air. The shot below is a single AF point with the EF 800mm f/5.6L lens tracking a moth, needed a bit more shutter speed to freeze him.

20131015_Marina_SunriseBirds-1297.jpg

When you are ready for eagles join Rick Sammon and me in Alaska and let's shoot! 

Alaska!
Tags Hal Schmitt, Rick Sammon, action photography, auto focus, birds in flight, zone, photography checklist
Comment

The Test Shot

December 4, 2012 Light Photographic Workshops
​Killer whale attacking a Steller's sea lion

​Killer whale attacking a Steller's sea lion

There are many shots that require you to react extremely quickly in order to capture what you want such as these whales I photographed during one of my Alaska workshops.  One of the most successful techniques you can use is what I call the "test shot."

The test shot has two primary objectives, exposure and rough focus.  When taking a test shot your actual subject is usually not in the frame.  For example, these whales break the surface in less than a second and if I wait until the subject is in the frame to find exposure I will be less than successful most of the time.  If instead I anticipate where the subject will appear or what the event will look like, I can figure out exposure ahead of time very easily.  I can also pre-focus so that the precision focus process is much faster once my subject is in frame and my auto focus sensors are properly placed.

​A humpback whale going for it in front of Devil's Thumb

​A humpback whale going for it in front of Devil's Thumb

When you make a test shot, it is often times not adequate to set exposure based on the environment/background.  You need to anticipate what will drive the exposure.  For example, in all three whale shots the critical elements are the white water and the white fins/body.  If I make a test shot of just the water and set exposure without considering the extreme tonal difference between water and white water/whale, I will, most likely, blow the highlights in the shot. When I made the test shots for these images, I set my exposure based on white not on the water/background.  You can use rules of thumb to underexpose for the predicted highlights but I prefer actual meter data, when I can get it.  In these examples, I changed my camera's metering mode to Spot and then I set exposure off of something white.  I actually used the boat's wake but a white sheet of paper would work as well.  As long as the white is under the same lighting conditions as my subject, my exposure will work perfectly.

​.1" earlier

​.1" earlier

This process is simpler when shooting in Manual exposure mode but can be used with Aperture or Shutter priority and auto exposure lock.  Once I have my exposure, I pre-focus to the expected subject distance and take a test shot and evaluate. With my exposure and pre-focus set, I am much better prepared to quickly execute the actual shot when the action occurs.

I use test shots all the time to give myself the advantage when something might happen and my reactions have to be perfect. When I am out photographing, people find it odd that I am shooting every now and again at what appears to be nothing. But my "strange" behavior pays off.  If you stack your deck ahead of time you will enjoy success in a more consistent and repeatable manner. 

Fiat Lux!

In tips Tags Alaska, photo tour, Hal Schmitt, Bull Schmitt, digital photography, action photography, wildlife photography, workshop
Comment
Use the code "LightWorkshops" and receive 15% off of Photomatix Pro.

Use the code "LightWorkshops" and receive 15% off of Photomatix Pro.

  • Adobe
  • Alaska
  • Bull Schmitt
  • California Photo Festival
  • Canon Explorer of Light
  • Click!
  • digital photography
  • Hal Schmitt
  • HDR
  • Lightroom
  • Lightroom 4
  • panorama
  • photo tour
  • Photoshop
  • Really Right Stuff
  • Rick Sammon
  • Topaz Labs
  • Victoria Schmitt
  • video
  • wildlife photography

ARCHIVES BY DATE

  • March 2015 (1)
  • September 2014 (1)
  • August 2014 (1)
  • July 2014 (3)
  • June 2014 (1)
  • May 2014 (1)
  • April 2014 (2)
  • November 2013 (3)
  • October 2013 (3)
  • September 2013 (6)
  • August 2013 (5)
  • July 2013 (2)
  • June 2013 (4)
  • May 2013 (5)
  • April 2013 (4)
  • March 2013 (6)
  • February 2013 (3)
  • January 2013 (3)
  • December 2012 (4)
  • November 2012 (1)
  • October 2012 (3)
  • September 2012 (3)
  • August 2012 (5)
  • July 2012 (2)
  • June 2012 (5)
  • May 2012 (4)
  • April 2012 (4)
  • March 2012 (2)
  • February 2012 (1)
  • January 2012 (6)
  • December 2011 (1)
  • November 2011 (2)
  • October 2011 (2)
  • September 2011 (13)
  • August 2011 (9)
  • July 2011 (9)
  • June 2011 (5)
  • May 2011 (18)
  • April 2011 (7)
  • March 2011 (10)
  • February 2011 (12)
  • January 2011 (7)
  • December 2010 (6)
  • November 2010 (5)
  • October 2010 (3)
  • September 2010 (7)
  • August 2010 (2)
  • July 2010 (20)
  • June 2010 (6)
  • May 2010 (4)
  • April 2010 (8)
  • March 2010 (12)
  • February 2010 (8)
  • January 2010 (9)
  • December 2009 (9)
  • November 2009 (13)
  • October 2009 (18)
  • September 2009 (25)
  • August 2009 (38)
  • July 2009 (26)
  • June 2009 (18)
  • May 2009 (9)


BLOG     |     NEWSLETTER     |    VOLATUSWINE

The images on this website are protected by federal copyright registration by each individual photographer/creator. Any unauthorized use is a federal offense with penalties of up to $150,000. Unauthorized use includes any copying of images from this site.

SIGN UP TODAY FOR ONE OF OUR PHOTOGRAPHY WORKSHOPS AND TAKE YOUR PHOTOGRAPHY TO THE NEXT LEVEL!​