• Home
  • Hal and Victoria Schmitt
  • Contact
  • Blog
Menu

LIGHT Photographic Workshops

Street Address
Templeton, CA 93465
805-550-4274

Your Custom Text Goes Here

LIGHT Photographic Workshops

  • Home
  • Instructors
    • Hal and Victoria Schmitt
  • Info
    • Contact
    • Blog
20110327_MdO_Poppy-64.jpg

Blog

LIGHT Photographic Workshops blog discusses everything photography related. Adobe updates, computer suggestions, accessories that can save your life and more!

"Mask" with Blend Modes for Easy Composites

May 24, 2011 Light Photographic Workshops

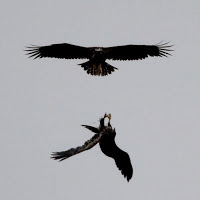
The two images above do not really work for me separately.  I thought they might look better combined so I played around with them a bit.  I am not a big fan of spending a large amount of time selecting or masking unless I absolutely must.  When I do mask I use either Photoshop alone or Topaz Remask.  For this composite, I wanted to try a blend mode switch and see if I could avoid any selections or masks.  The process I used is below.

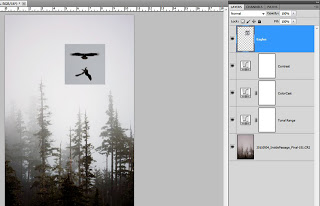
The first step was to create a stack by layering the two images in Photoshop.  I used the trees as a background and added a few Curves Adjustment Layers to fix tonal range, color cast, and add contrast (you could also do that in Lightroom first.)  At the top of the layer stack is my eagle fight shot.  I moved the eagles into a possible position and am now ready to try a blend mode switch.

With the eagle layer active I changed the blend mode to Darken.  The Darken blend mode works by displaying only the parts of the active layer that are darker than underlying pixels (in lower layers.)  I thought the eagles are darker than the sky so maybe it would work.  Unfortunately, the sky in the eagle layer is darker than the background sky.

To fix this little issue, I added a Curve Adjustment Layer and set it to affect only the eagle layer.  To do this click on the the click to clip to layer icon that looks like a dark circle on top of a light circle at the bottom of the Adjustments panel or hold down the Alt/Opt key and click on the line separating the eagle layer from the Curve layer (you will know you are in the right place when your cursor changes to the dark/light circle icon.)  When we set up a clipped layer the adjustment will only effect the layer it is clipped to.  In this case, the curve only modifies the eagle.  As I drag the curve up notice less of the sky around the eagles is visible.

I continued to move the curve up until the sky on the eagle layer was lighter than the sky of the background.  Now only the eagles themselves show up with the Darken blend mode.

Final step for me was a Black and White adjustment layer.  Not sure I will ever use the image but I like the result better than where I started and the technique is a great tool to have in your kit.  This also works in reverse using the Lighten blend mode.
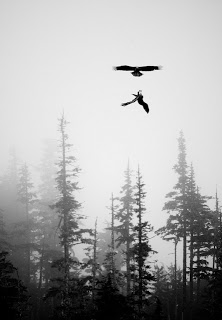
​The final composite

​The final composite

Fiat Lux!

In tips Tags Adobe, Photoshop, Hal Schmitt, Bull Schmitt, bald eagle, eagle
← Fisheye Pano and A Little VideoCouple of HDRs and Component Pre-Processing Tips →
Use the code "LightWorkshops" and receive 15% off of Photomatix Pro.

Use the code "LightWorkshops" and receive 15% off of Photomatix Pro.

  • Adobe
  • Alaska
  • Bull Schmitt
  • California Photo Festival
  • Canon Explorer of Light
  • Click!
  • digital photography
  • Hal Schmitt
  • HDR
  • Lightroom
  • Lightroom 4
  • panorama
  • photo tour
  • Photoshop
  • Really Right Stuff
  • Rick Sammon
  • Topaz Labs
  • Victoria Schmitt
  • video
  • wildlife photography

ARCHIVES BY DATE

  • March 2015 (1)
  • September 2014 (1)
  • August 2014 (1)
  • July 2014 (3)
  • June 2014 (1)
  • May 2014 (1)
  • April 2014 (2)
  • November 2013 (3)
  • October 2013 (3)
  • September 2013 (6)
  • August 2013 (5)
  • July 2013 (2)
  • June 2013 (4)
  • May 2013 (5)
  • April 2013 (4)
  • March 2013 (6)
  • February 2013 (3)
  • January 2013 (3)
  • December 2012 (4)
  • November 2012 (1)
  • October 2012 (3)
  • September 2012 (3)
  • August 2012 (5)
  • July 2012 (2)
  • June 2012 (5)
  • May 2012 (4)
  • April 2012 (4)
  • March 2012 (2)
  • February 2012 (1)
  • January 2012 (6)
  • December 2011 (1)
  • November 2011 (2)
  • October 2011 (2)
  • September 2011 (13)
  • August 2011 (9)
  • July 2011 (9)
  • June 2011 (5)
  • May 2011 (18)
  • April 2011 (7)
  • March 2011 (10)
  • February 2011 (12)
  • January 2011 (7)
  • December 2010 (6)
  • November 2010 (5)
  • October 2010 (3)
  • September 2010 (7)
  • August 2010 (2)
  • July 2010 (20)
  • June 2010 (6)
  • May 2010 (4)
  • April 2010 (8)
  • March 2010 (12)
  • February 2010 (8)
  • January 2010 (9)
  • December 2009 (9)
  • November 2009 (13)
  • October 2009 (18)
  • September 2009 (25)
  • August 2009 (38)
  • July 2009 (26)
  • June 2009 (18)
  • May 2009 (9)


BLOG     |     NEWSLETTER     |    VOLATUSWINE

The images on this website are protected by federal copyright registration by each individual photographer/creator. Any unauthorized use is a federal offense with penalties of up to $150,000. Unauthorized use includes any copying of images from this site.

SIGN UP TODAY FOR ONE OF OUR PHOTOGRAPHY WORKSHOPS AND TAKE YOUR PHOTOGRAPHY TO THE NEXT LEVEL!​