Juan Pons- Wildlife Conservation One Photo at a Time!

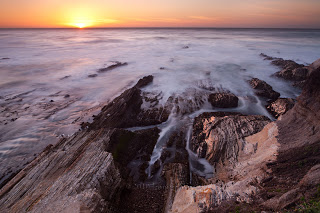
Juan Pons is a world famous wildlife and nature photographer with an uncanny ability to connect with the creatures of this world and their habitats. With more than 20 years of experience behind the lens, Juan has dedicated much of his work to supporting wildlife and natural habitat conservation, often donating his images to non-profit organizations with nature and wildlife conservation goals. 

With the photo industries recent movement towards video, Juan has become a recognized expert in the idiosyncrasies of of shooting High Definition video with the latest DSLRs.
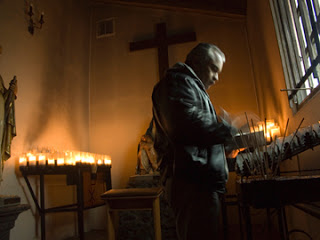
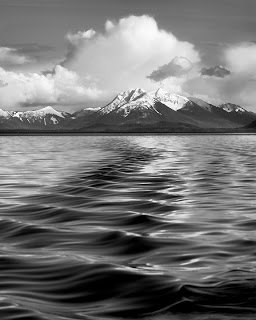
​© Juan Pons

​© Juan Pons

Taken during the 1st annual California Photo Festival, Juan is part of our incredible line -up of instructors at the 2nd annual California Photo Festival October 12-16, 2011. With events scheduled for all five days of the festival, you can learn essential shooting techniques for capturing beautiful landscape and wildlife images. Juan's workshop topics include vDSLR shooting and editing, Shooting Better Wildlife Photography, Sunrise- Capturing the Pink Light and more!

Here's what Juan is saying about the California Photo Festival...

What do you look forward to the most about this year's California Photo Festival?
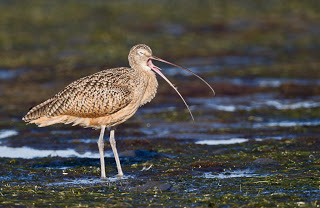
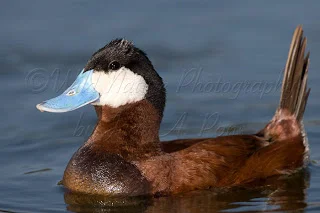
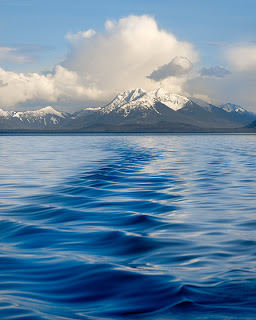
​© Juan Pons

​© Juan Pons

Taken during the 1st annual California Photo Festival

"I love the energy, enthusiasm and the real desire to learn that each and every festival participant brings to the event. Plus I love meeting new people who are passionate about photography."

Why should photographers join you at the California Photo Festival?

"One of the things that is not mentioned enough is the camaraderie and friendships that are forged amongst festival participants as well as with the instructors. Spending 5 days with like minded people does wonders for feeding that love of photography and supercharging your creativity."

To learn more about Juan Pons and his adventures visit www.JuanPons.org

Join Juan and other amazing photographers for the largest photography event on the Central Coast this October for the 2nd annual California Photo Festival.

To see all of our events, instructors and more visit

CaliforniaPhotoFest.com

The Dreadful Banding, Bane of the Photo Printer and How to Get Rid of it!

by Lee Varis

Most photographers who print their work encounter this sooner or later. It often rears its ugly head in clear sky gradients – the dreaded banding, posterized tonal gradients that break into discrete bands that destroy the smooth appearance of the sky. This is a "digital" artifact that is mostly blamed on 8 bit files! The fact is that banding in a print can often result even with high-bit depth files during the conversion to the printer profile for output. The problem is hard to predict or pre visualize and this can result in wasting expensive paper to discover that you have to "fix" something in the file.

The following image demonstrates the nature of the problem.

sky

It looks smooth doesn't it... but, if we look at the individual channels maybe we can spot the problem...

sky red channel

The green and blue channels don't really show anything but here in the red channel we can just barely see that there might be an issue. It's subtle though so we can't really be certain that there will be a problem. The issue of banding in skies, or any smooth gradient for that matter, has been around as long as digital imaging has existed and there have been numerous attempts to solve the problem. Back in the day, when real high-end imaging was only possible using Scitex and Quantel Paintbox systems the solution was more or less the same as it is today - one has to add noise in some fashion or another to break up the bands. Outputting a file only to discover that there were bands was quite expensive so many shops resorted to adding noise as a standard procedure before outputing anything. However, adding noise often resulted in a gritty appearance and if it wasn't necessary it wasn't desireable.

One of the original Quantel Paintbox engineers, Ed Manning, invented a technique to pre visualize the bands and old timers like myself will still refer to this as "Ed's Curves" – Now its mostly referred to as "solar curves." This technique is still useful as part of our strategy to eliminate bands. Begin by duplicating the background to a new layer...

Layer Panel with Curve Adjustment

To setup "Eds Curves," make a new Curves Adjustment Layer at the top of the layer stack and, once you are in the Adjustments Panel, place multiple points on the Curve...

Points on Curve

Now, pull the points up and down so that you end up with an extreme sine wave sort of thing like this:

Extreme Wavy Curve

The result puts all the tone transitions on a mostly vertical segment of the curve so we have a lot of contrast between tones – we also have a fairly psychedelic image...

psychedelic sky

Despite the rainbow color the image shows very obvious sharp ridges running through the sky. We can leave this temporary Curves adjustment on to help visualize just how much noise we need to eliminate the ridges. Select the duplicate layer and run the noise filter: Filter->Noise-> Add Noise...

psycho sky with noise

The idea is to use enough noise to completely hide or obscure the ridges. This is the traditional approach that most prepress professionals use. The problem with this approach is that often quite a bit of noise is necessary and it can lend the image a harsh look...

Noise in sky

Sometimes this will not look as bad in a print but there is a better approach. Instead of using the standard noise filter, use: Filter->Brush Strokes-> Spatter...

Brush Strokes

The large filter dialog allows you to select multiple artistic filters intended for creating painterly effects.

Filter Dialog

For our purposes, we want to have a high "Spray Radius" and a Smoothness setting of "1"

Spatter Settings

This filter is much more effective in smoothing out bands in a gradient than simply adding noise. The only trick is in masking off the dark "spatter" of the non-sky elements at the horizon. For that we can turn to the Blending options dialog...

Blending Options
Blending Options dialog

Setup the "Blend If" sliders for the Blue channel as shown above - the idea is to blend through the dark, non-sky tones to reveal the "un-spattered" image in the Background. Sometimes you can get away with only using the slider in the top layer – here I've used both to get a cleaner image. Often you'll have to do a little bit of masking for final cleanup – add a layer mask to the "Spatter" layer and mask out the dark speckles with black.

The final result is smooth with less obvious noise...

Smooth Sky

Compare this with the original and with the noise version! Spatter breaks up the bands with diffusion instead of adding light and dark noise so there is no grittiness and no bands. At this point you can throw away the Curves Adjustment layer and print with full confidence that you have vanquished the dreaded bands forever!

Remember "Ed's Curves" and use them whenever you have the slightest suspicion that banding may be present and you can clearly visualize the 'bands" before they bite you in the butt...

Learn more incredible digital imaging techniques from Lee Varis at the California Photo Festival, October 12-16, 2011! Lee will be teaching all 5 days during the festival, discussing topics like The Digital Zone System, Mastering Exposure, High Speed Camera Techniques and more!

Click here to see Lee's full festival schedule.

Lee Varis- A Digital Capture Master!

Lee Varis is a well know veteran of the photography industry. Jumping in head-first when the digital age came about, Lee has become an expert in utilizing the particularities of digital capture and digital imaging technologies to create beautifully crafted images.

Lee's creative imaging has been featured in National Geographic and Fortune magazines as well as numerous trade publications including: Photo-Electronic Imaging, Studio Photography, PC Photo, Rangefinder Magazine, Photo District News and Mac Art & Design.

​© Lee Varis

​© Lee Varis

As a guest instructor here at LIGHT Photographic Workshops, Lee has taught many students how to capture and enhance photographs with incredible detail and "pop" without the plastic feel of many of today's digital photographs.

We talked to Lee about his experiences here at Light and why he is excited to be part of this year's California Photo Festival...

Why do you enjoy teaching at Light?

"LIGHT Photographic Workshops offers a great facility as well as one of the most picturesque locations on the California coast. The students here are passionate about photography and learning– the combination of these two makes for a wonderful experience!"

Why will students enjoy attending workshops at Light and the California Photo Festival?

"The intimate setting provides a truly exceptional learning opportunity, and contact with other dedicated photographers and instructors makes for fun times in picture making!"

​© Lee Varis

​© Lee Varis

Lee will be sharing many of his digital imaging techniques at this year's California Photo Festival, October 12-16, 2011. His workshops include Intro to the Digital Zone, High-Speed Camera Techniques, and Skin-Natural Enhancements for Portraits (based on his book acclaimed book series!).

Click here to see all of Lee's events at the California Photo Festival.

Learn more about Lee Varis by visiting Varis.com!

Don't miss your opportunity to learn the latest tips and techniques from this digital imaging master! Sign-up today at CaliforniaPhotoFest.com!

Parish Kohanim and the Dynamic Figure

Parish Kohanim has been successfully involved in the photography industry for over 25 years. Working commercially for a large portion of his career, Parish has shot for advertising agencies, design firms and Fortune 500 companies including IBM, AT&T, DeBeers, and Coca-Cola. His work has also been published in Vogue, Harper's Bazaar, Forbes, Time and Newsweek. 

In recent years Parish has turned his focus towards fine art photography, creating stunning imagery using figure and dance including projects with members of Cirque Du Soleil. 

We are happy to have Parish Kohanim joining our incredible team of instructors at this year's California Photo Festival, October 12-16, 2011. Parish will be teaching a number of workshops including Creating Dynamic Figurative Shots and What Makes a Portrait Successful.

Here's what Parish has to say about the California Photo Festival....

Why do you look forward to teaching at the California Photo Festival?

"I am looking forward to meeting participants of the workshops who share the same passion for photography that I do. I continually search to find exciting and diverse perspectives of the world around me, evolving and expanding my vision and that is what I want to share with the class."

Why will students enjoy participating in your workshops?

"It is exciting to push all of the workshop participants, as well as myself, not only to see differently, but to shoot in new ways, breaking not only my comfort zone, but every one's in the class. We will find ordinary objects and make them extraordinary through our vision."

Join Parish at this year's California Photo Festival to learn the latest tips and techniques from a portrait and fine art photography master!

Learn more about Parish at ParishKohanim.com. To see all of Parish's events during the California Photo Festival click here! Also, take a look at thesegreat videos showing Parish at work in his studio and get a feel for what you can learn from this talented photographer. Parish will also be giving a free and open to the public 

Explorer of Light presentation, Wednesday, October 12th from 3:30 - 4:45pm at Embassy Suites in San Luis Obispo, as part of the California Photo Festival and sponsored by Canon.

This Week's Tip from Rob Sheppard!

A Difference in Seeing

One of the things we do very well is see all sorts of detail in a scene in nearly any light except when it gets very dark. So as photographers, it is very easy to see the subject.

Unfortunately, the camera does not work that way. The camera sees and emphasizes light and contrast. This different way of seeing is a challenge we all face as photographers. Often photos are unsuccessful because what we see and what the camera sees are two different things. We want the camera to see the subject as we do, but it doesn't.

​Image by Rob Sheppard © 2011

​Image by Rob Sheppard © 2011

A good way to see what the camera is seeing is to focus on light, not on subject. That does not mean you don't think about the subject -- that is only what gets you started. Then you try to photograph the light. That makes me remember a really eye-opening exercise, too. Go out for an afternoon and photograph the light and its effects, including shadows. Don't photograph "subjects" at all, just light.

It also helps to check your LCD and see what is emphasized -- the light helping your subject or the light fighting your subject. Remember that bright areas in a composition will always attract a viewer's eye and so they can be very distracting if in the wrong place.

​Image by Rob Sheppard © 2011

​Image by Rob Sheppard © 2011

Finally, realize that sometimes you just have to say "no" to a subject in a particular light that just will not work. As Steve Jobs said once, "It's only by saying no that you can concentrate on the things that are really important."

-Rob Sheppard

For more of these great tips from Rob check out the new iPad app "Rob Sheppard's Digital Landscape" developed by our very own Juan Pons! Based on his recent book "The Magic of Digital Landscape Photography" this app delivers essential tips on how to capture better landscape photographs and is paired with fantastic imagery.

Rob also has a great new eBook "Selling Photos" available for download through the Kindle Reading app (can also be download to your home computer or laptop)

Rob Sheppard and Juan Pons are both part of our incredible line-up of instructors at the California Photo Festival, October 12-16, 2011. See who's coming, the schedule of our awesome events, and last year's highlights at CaliforniaPhotoFest.com

A Photo is Worth a Thousand Words with David H. Wells behind the Lens

Davis H. Wells is a master of creating the photo essay. Throughout the years his stories and images have been published in countless publications including Life Magazine, Los Angeles Times Magazine, New York Times Magazine, and Chicago Tribune.

​Image by David H. Wells © 2011

​Image by David H. Wells © 2011

David was recently featured in Photo District News as one of "The Best Workshop Instructors." We are very excited to have this experienced photojournalist and inspirational teacher as part of our team of instructors at this year's California Photo Festival, October 12-16, 2011. David will be teaching a variety of workshops including Creating the Photo Essay, Light Studies, and several hands-on shooting courses.

Here's why David is coming back for another awesome year at the California Photo Festival and why you should join him!

Why do you enjoy teaching at the California Photo Festival?

I love being part of the community that is created at the California Photo Festival! I also love working in the most beautiful part of California. As a teacher, I thrive on helping others become part of that community, enjoy the environment and then make photographs of that experience to share with others.

Why do you think students will enjoy learning at the California Photo Festival?

Learning so many things in smaller doses (as compared to full week workshop) enables you to learn many things that you can practice and refine after the workshops. It also gives you the opportunity to try new styles of working that you may not have tried before and would not likely try if it required the commitment of a full on workshop.

​Image by David H. Wells © 2011

Image by David H. Wells © 2011

Don't miss your chance to get incredible feedback and learn how to create a powerful series of photographs from this world class photographer. Learn more about David H. Wells by visiting DavidHWells.com

There's only 28 days left to join the largest photography event on the Central Coast! See all of our incredible instructors, festival events and register today by visiting CaliforniaPhotoFest.com!

So Much to Learn from Jane Conner-ziser

Jane Conner-ziser has been teaching digital imaging courses here at Light Workshops for the last couple years and has quickly become one our most popular instructors. As a photographer, media artist, independent consultant and teacher for the professional photography industry, Jane is internationally recognized as a leading expert in digital imaging technology.

Jane will also be a big part of this year's California Photo Festival, October 12-16, 2011, teaching a variety of classes including portrait retouching, painting in Corel Painter and Adobe Photoshop, and several hands-on shooting workshops.

Here's what Jane has to say about her experiences at Light and the awesome events at this year's California Photo Festival...

Why do you enjoy teaching at Light Photographic Workshops?

Light has such amazing energy and the people at Light are tireless in providing variety of locations, newest technologies and meaningful learning experiences - AND they are really, really nice, down to earth people. Come once, and you'll count the days til you get to go back again.

Why will students enjoy learning at the California Photo Festival?

You're going to get a wide variety of creative learning experiences from the best in the business. You'll make new friends, connect with peers from all over the country and you'll have an awesomely (is that a real word?) FUN time!

​Image by Jane Conner-Ziser © 2011

Image by Jane Conner-Ziser © 2011

Between digital painting, incredible portrait retouching, studio and location lighting and even marketing, there's so much to learn from this talented and fun instructor!

Click here to see all of Jane's events at this year's California Photo Festival.

Learn more about Jane Conner-ziser by visiting janeconner-ziser.com

Join in on the fun at this year's California Photo Festival, October 12-16, 2011 and get the expert instruction you've been looking for to enhance your digital photography skills! Check out our incredible line-up of instructors and all the events by visiting CaliforniaPhotoFest.com.

Sign-up today and become part of the largest photography event on the Central Coast!

Teachers Learning from their Students

Photography Tip to Keep in Mind
by Don Monkerud

***Don Monkerud is a writer from Santa Cruz, California, and one of our students here at LIGHT Photographic Workshops. Recently, Don sent us a story that we feel is a great lesson for amateurs and pro photographers alike. ***

Anyone who photographs people, especially in public, invariably runs into the irate subject or bystander who objects to having their, or someone else's photograph taken.

My rule of thumb is always to ask permission, but occasionally I'm working too fast, already gained permission earlier, or simply 

​Image by Don Monkerud

Image by Don Monkerud

overlooked asking the subject for their permission. Sometimes such oversights can become costly, in embarrassment, rejection, mistreatment or even loss of a job.

A recent incident in the local jazz club where an experienced photographer has been taking photographs for years can be a reminder to all photographers. Over the years, he became somewhat lackadaisical about showing up at the beginning of musicians' sets, instead showing up midway through their sets and simply snapping away.

While posted signs and an announcement at the beginning inform listeners that there is to be no recording or photography during the show, the club photographer volunteers to take photographs for the club's website. The last time he showed up after a show began and started snapping away, the singer stopped the musicians in the middle of a song and demanded that he erase all the photos on his card. Who the hell did he think he was? He mumbled an expletive half under his breath, which didn't go over well either.

​Image by Don Monkerud

Image by Don Monkerud

The new photographer makes a point of showing up during the sound check to ask permission. A valuable lesson, for I'm sure the original photographer was not only embarrassed but also humiliated, and he lost his gig. The lesson is to always ask permission and not get so used to a regular gig as to become lackadaisical.

A question about usage also arises. While this has been a volunteer job, what rights does the photographer have to the work? The initial meeting with the musicians is the time to set the parameters: Can the photographer use the photos only for the club? What about art shows or sales on a website? Should an agreement be signed? etc.

Whatever rights are requested and granted, the photographer must to be aware of the first rule in taking photographs in such a setting: 

Always ask permission.

By Don Monkerud
Copyright 2011

****

We are happy that Don was willing to share this learning experience so that all of us could learn from it. If you have had a photography experience that you feel others can learn from please share them with us! Contact us at info@lightworkshops.com with your tips and shooting stories.

For more photography tips you can visit our LIGHT Photographic Workshops Page or our California Photo Festival Page on Facebook. Sign-up to receive our weekly Newsletter and be the first to see the latest updates to our workshop schedule and get more photography tips from our fabulous instructors!

Fiat Lux! 

A Great Tip from Wildlife Photography Specialist Juan Pons

Connecting with your subject

The most compelling photos are those that create a connection between your subject and your viewer. This not only applies to wildlife photography, but just about every other type, such as portrait, wedding, human interest, travel, Photojournalism, etc.

As the old cliché goes, “You never get a second chance to make a first impression”, so make sure your viewer connects with your image right from the get go.

The most effective way to create that connection is to maintain eye level with your subject, I am always amazed by how so many people will take images from a standing position without regard to their relative eye level to their subject. I see this all too often when judging competitions at local photo clubs.

​Photo by Juan Pons

​Photo by Juan Pons

For example, a beginning photographer will go to a local park or botanical garden to shoot some of the very tame and accessible waterfowl on a local pond, they will stand at the bank of said pond and as the birds are accustomed to being fed, they will approach. While standing the photographer will let it rip and take a bunch of images.

Unfortunately most, if not all, of those images will be very uninspiring. Why? Because they will show the subject while you are looking down at it, with hardly any eye contact. Without that eye contact it will be very difficult for the viewer to make a connection to the subject of your image. Also we are all accustomed to seeing ducks and other waterfowl from a standing position. An image that presents an unusual or fresh view on a subject has a better chance of having an immediate impact on the viewer, hence a good first impression.

​Photo by Juan Pons

​Photo by Juan Pons

Getting down low, very low, even lying down on the ground, to get at eye level is crucial in this situation in order to get an eye level shot.

In the two images shown accompanying this tip, I was in such a park, where the birds were tame and accustomed to humans. They would get very close looking for a handout.

I was lying down on the ground, with my lens on a beanbag getting shots as close to eye level as I possibly could. Being eye level to the Wood and Ruddy ducks present images of subjects that are engaged with the viewer and as such they are much more attractive and appealing; hopefully images that connect with the viewer.

We're excited to have Juan Pons as one of our instructors at this year's California Photo Festival, October 12-16, 2011! Juan will be here teaching wildlife photography, video DSLR techniques and more!

Click here to see all of Juan's festival events! 

Join us this year for the largest photography event on the Central Coast! Register today at CaliforniaPhotoFest.com.

Get more tips from our festival instructors by visiting our California Photo Festival Page

on Facebook!

Tethered Shooting Spacer

I have always found it a bit unwieldy when shooting in a vertical/portrait orientation with a tethering cable attached.  Recently, Really Right Stuff (RRS) made the perfect solution and I was fortunate to shoot with the Cable Release Spacer (CRS) today. 

The CRS attaches to a standard L-bracket and adds about 1.25" for your tethering cable.  It also has a small locking bar to "lock" your cable to the spacer.  This is great since any tugging on the cable can easily damage your camera's ports, a very expensive fix by the way.

Vertical orientation. The CRS firmly attaches to your L-bracket for stability.

 Horizontal orientation, not much change but cable is firmly attached.

If you are a tethered shooter and are tired of dealing with work arounds for your cable when shooting vertically, pick up a RRS Cable Relief Spacer and all is good.

Click here to visit the RRS site.

Fiat Lux!

Why Jennifer Wu Loves the California Photo Festival!

Canon Explorer of Light, Jennifer Wu, is an amazing instructor and has taught many workshops here at Light. She will also be joining us for a second year at the California Photo Festival, October 12-16, 2011!

Jennifer has shared her reasons why she can't wait for another year of teaching at the California Photo Festival and why you should join us for this incredible event!

Why do you enjoy teaching at Light and the California Photo Festival?

"I love teaching workshops at Light Photographic Workshops and the California Photo Festival. The facilities are great but even better is the supportive environment. We have fun and get in lots of great shooting as well."

Why should students join us for the California Photo Festival?

"The California Photo Festival is a blast. There is so much going on with plenty of interest for all types of photography. I have a great time leading the field workshops and giving the lectures. There is something for everyone at the event with so many different instructors who cover portraits, digital imaging and processing, wildlife and of course my favorite, landscape photography."

​Image by Jennifer Wu.

​Image by Jennifer Wu.

Taken while teaching a workshop at LIGHT Photographic Workshops. Click here to see a list of all of Jennifer's classes happening during this year's California Photo Festival. 

Jennifer will be on display at the Epic Light Gallery at LIGHT Photographic Workshops starting September 30th. As well as teaching our Print Perfection workshops with Hal Schmitt and Barbara Ellison October 6-9, 2011.

Learn more about Jennifer by visiting JenniferWu.com

As the California Photo Festival quickly approaches we are getting more and more excited about hosting the largest photography event on the Central Coast!

If you would like to join us for the 2nd annual California Photo Festival this October, sign-up today at CaliforniaPhotoFest.com!

Fiat Lux!

Why Rick Sammon Loves Working with LIGHT!

Recently we have spoken with several of our guest instructors about why they decide to come back to the Central Coast and teach at Light Photographic Workshops. 

Canon Explorer of Light, Rick Sammon, is a popular guest instructor here at LIGHT, as well as our Keynote speaker for this year's California Photo Festival. Here are his thoughts on why he enjoys teaching at Light Photographic Workshops and why you'll enjoy attending one of our fantastic digital photography classes. 

Why do you enjoy teaching at Light?

"I enjoy teaching at Light for three reasons: One, the picturesque setting is ideal for creative photographers. Two, the students are dedicated to serious learning and serious fun (we have a lot of fun after hours). Three, I learn from the other instructors."

Why do you think students will enjoy learning digital photography at Light?

"Light offers a unique combination of shooting in a wonderfully peaceful setting that gets the creative juices flowing. What's more, the small class size is unique among workshops."

​Image by Rick Sammon. 3 shot HDR

​Image by Rick Sammon. 3 shot HDR

Shot with the Canon 5DII and Canon EF 15mm Fisheye lens. Taken during the "Exploring the Light" workshop at LIGHT Photographic Workshops.

We're happy to have Rick Sammon joining us for this year's California Photo Festival, October 12-16, 2011! 

Rick will be teaching a variety of topics including HDR, Social Media Marketing, Lighting and more. Click here to see the full list of Rick's festival events!

Learn more about Rick at RickSammon.info

Visit CaliforniaPhotoFest.com to see our incredible line-up of instructors and all the events happening at this year's California Photo Festival!

Back in Cali

Great to be back home after a somewhat wet, windy, and no electrical power trip out east.  The school has been busy working the California Photo Festival and I am very impressed with the work the staff has done.  Should be another killer week of fun, photography, and learning. 

Even though hurricane Irene let loose with an unreal amount of rain I was able to make some interesting images over the four days I was in New York.

The following images are from a little indoor HDR trip just down the road from Rick's place.

​3 Shot HDR with Nik's HDR Efex Pro

3 Shot HDR with Nik's HDR Efex Pro

​Same 3 Shot HDR with HDR Soft's Photomatix Pro

​Same 3 Shot HDR with HDR Soft's Photomatix Pro

I often use multiple methods to process my HDR and then pick the best option.  Of course, there are times I pick and choose different parts to use from different finished images.  Whether using Layer Blend Modes or Layers/Masks, there is no limit to what you can do.

​The B&W Effects conversion, for giggles.

​The B&W Effects conversion, for giggles.

All shots are from a Canon 7D and an EF 14mm f/2.8L.  I processed initially in Lightroom and then sent to the respective plug-ins.

Fiat Lux!

Topaz B&W Effects Available Tomorrow

Topaz will release B&W Effects tomorrow.  It has been fun as part of their beta test group.  What has been even better is they made quite a few changes based on input we submitted.

I think this is a strong entry into the black and white conversion market.  There are some good features you will not find other places.  I am a big fan of the brushes for local adjustment to tone, detail, smoothness, and color.

I should have some tutorials up soon and hopefully a webinar on B&W Effects in September. 

​Baby humpack having fun.

Baby humpack having fun.

​The day was very muted so with little color to begin with black and white seemed a natural option.

The day was very muted so with little color to begin with black and white seemed a natural option.

Click here for the Topaz purchase/upgrade page.

B&W effects will be on the page tomorrow.

Fiat Lux!

First Conversion with Topaz BW Effects

I began playing with and testing the soon-to-be-released Topaz B&W Effects plug-in today.  There is some serious power in the program.

My first take is the black and white conversion is very good.  In addition, the plug-in gives me access to Topaz Adjust-like effects and control over exposure and contrast transition.  There is so much in the program it will take me a couple days to give a full report.  Another great tool to have in the kit.

 B&W from Topaz B&W Effects


Color from Canon and Lightroom


Should be fun testing this one out.

Fiat Lux!

The California Photo Festival- Don't miss the biggest photography event on the Central Coast!

Get your pass now to the 2nd annual California Photo Festival, October 12-16, 2011!

This year will be better than ever with 17 world class instructors, awesome hands-on learning, and the beauty of the Central Coast.

Our incredible line-up of instructors includes Rick Sammon, Hanson Fong, Rob Sheppard, Jennifer Wu,  David H. Wells and Hal Schmitt.

Click here to see the full line-up of instructors.

With 170+ events during the week we have something for every level of photographer, from shooting horses on the beach at sunset to mastering indoor lighting techniques.

Click here to see the full schedule of events!

Get your pass before August 30th and pay only $449 for all 5 days of the festival with our Early Bird discount. Use discount code "earlybird2011" to take advantage of this killer deal.

Visit CaliforniaPhotoFest.com or call the office 805-528-7385 for more details.

Fiat Lux!

A Shooting Tip from Jennifer Wu!

Photographing Water in Motion|
by Jennifer Wu (Canon Explorer of Light)

Vertical water f/16 Shutter speed .6, ISO 100. I used a polarizing filter.

Vertical water f/16
Shutter speed .6, ISO 100.
I used a polarizing filter.

Photographing moving water at varying shutter speeds will offer different looks, from the silky to having detail and texture. When photographing the ocean surf, waterfalls, streams or any moving water, I would consider bracketing the shutter speeds for a variety of results.

In the vertical photographic example of a waterfall in Iceland provided, the water features a smooth, silky looks. In the horizontal image of the same waterfall, the water presents more detail. I like both effects, so I vary the shutter speed to get more or less detail. I recommend bracketing the shutter speed and reviewing the image on view screen to judge the results. If you see silky water with no detail where it is all white, then use a faster shutter speed. If there is too much detail, use a slower shutter to create the velvety water effect.

Horizontal waterfall: f/16 Shutter speed 1/10, ISO 100. I used a polarizing filter.

Horizontal waterfall: f/16
Shutter speed 1/10, ISO 100.
I used a polarizing filter.

Shutter Speed Choice: The water flow will be fast with a large waterfall and slow with little stream, so the shutter speed will vary for each scene. In addition, depending on the focal length of the lens, it will provide less motion (wide angle) or more motion (telephoto).

I photographed the waterfall in Iceland while leading a photography tour in the horizontal image has a .6 second shutter speed for a satiny effect, while the vertical has a 1/10 shutter speed to get more detail.

In another example, the ocean images have a 10 second exposure to create the smooth look of the ocean surf.

In Yosemite, I use around 1/125 of a second for having some detail in the powerful, fast moving waterfalls yet 1/15 to 1/30 of a second for smooth streams in the valley.

Tripod: Using a STURDY tripod will be necessary for the slow shutter speeds. It is still a good idea for higher shutter speeds, as it will help with fine-tuning the final composition. Keep in mind it is often windy at the base of a waterfall or around the ocean surf.

Exposure: when taking a photograph, I decide whether the shutter speed or f/stop is the most important and set that first. Normally, I use manual mode and set the shutter speed then set the f/stop I want for the scene when photographing moving body of water as that is the most important. Next I would set ISO. I would use the native ISO for the camera, such as ISO 100 for Canon, or 200 for Nikon. If the shutter speed is too slow, I would raise the ISO to the proper exposure. Finally, I would use a filter, as discussed below.

Shutter Speed: In order to get slow shutter speeds for the satiny effect, try photographing in low light conditions as full sun maybe to too strong for slow motion. For example: photograph at low light near sunrise or sunset on sunny days, with the subject it by the first or last rays of light or when the water is in the shade. That can be on an overcast day or after sunset or before sunrise.

Filters: Using a polarizer will reduce your shutter speed time by about two f-stops. Turn the polarizer to see the effect on shinny rock surfaces. Be careful when using a polarizer so as not to take out desired colorful reflections. Neutral density filters, grey in color, will reduce the light to the sensor, allowing for a slower shutter speed.

Ideas: Some ideas include waterfalls, streams, cascades, ocean surf or a lake in stormy weather. I like photographing streams in the shade with green leaves reflected onto streams in the afternoon (Yosemite’s Fern Spring is good for that). I like to photograph along Yosemite’s Merced River at sunrise to get the warm reflections of the mountains in the river. Fall colors are another good one to look for.

​Morro Bay rocks and surf, F/16, 10 seconds, ISO 100. I used a 3-stop neutral density filter and a polarizer.

​Morro Bay rocks and surf, F/16, 10 seconds, ISO 100. I used a 3-stop neutral density filter and a polarizer.

The ocean examples were photographed during a Light Photographic Workshop I lead earlier this year. I will be going out to the same location, leading field workshops for the festival. I can’t wait! Hope you have fun photographing moving water and creating inspiring images!

​Morro Bay sunset, F/16, 13 seconds, ISO 100. I used a 5-stop neutral density filter.

​Morro Bay sunset, F/16, 13 seconds, ISO 100. I used a 5-stop neutral density filter.

We are proud to have Jennifer returning to the California Photo Festival October 12-16, 2011!

Jennifer will be joined by fellow Explorers of Light Rick Sammon, Hanson Fong, Parish Kohanim and more!

See all of our 170 + events by visiting CaliforniaPhotoFest.com!