September is Looking Great! Sign up now!


For those of you looking for something to do on Labor day weekend, we will have our 3-day Lightroom course with Hal Schmitt. This class is really helpful for the photographer who is trying to get a seamless workflow down for their photography.


We are just now adding another HDR class September 15-19 which is Tuesday-Saturday. We will be able to photograph some awesome cars and a few incredible areas that we have discovered that are perfect for HDR. Our sponsor, Really Right Stuff is letting us borrow their Panorama gear to show you how to create and process HDR panoramas as well!


And don't forget! Canon is coming into town for their first of many Canon Explorer of Light Lecture Series for only $5! 2 hours for $5 AND cookies? You can't go wrong. We will feature Jennifer Wu, one of their newest additions, for a three day Canon Field Photography workshop on the Central Coast with Canon Gear Rep Jim Rose bringing some awesome Canon lenses to play with!
Keep looking at the courses schedule for more additions! October will feature Canon Flash, Rob Sheppard, Jack Davis and Ben Willmore! Catch them now before they are gone!


Change of Subject


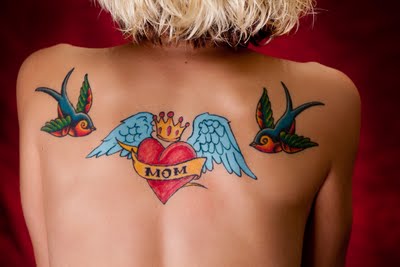
We've been a little HDR focused on the blog recently so I thought I would change it up and attach a shot from our studio. LIGHT is, of course, all things photographic.

The image is from a test shoot we did last week with the new Creative Light softboxes. So far, I highly recommend them and the prices are great, especially for LIGHT clients.

Fiat Lux!

Bull

HDR Guidelines Part 2


This is part 2 of Bull's HDR guidelines here at LIGHT.

Camera
-Manual mode
- ISO: 100 Canon / 200 Nikon
-Constant Aperture = vary shutter speed only
-Constant White Balance
-Continuous shooting drive mode – high if you have it
-Focus – One shot or one time.
-Use AF to assist and either hold AF-On button continuously through the shots or switch to manual focus after focus lock is achieved.
-Shoot RAW
-Use auto exposure bracketing (AEB) functionality as much as possible
-Know your camera’s capes and lims
-Use +/- 2 EV jumps (new Nikons only have 1 EV jumps available)
-Some scenes may use +/-1 EV for better results

How Many Shots?
-Depends on the scene’s dynamic range (DR)
-Meter the highlights and shadows and determine the difference between the two in stops
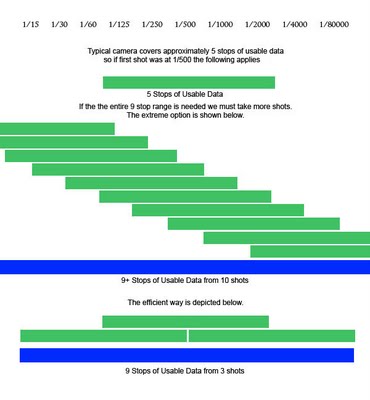
For example, with a constant aperture and ISO the highlights are exposed properly at 1/8000 and the shadows at 1/15, there is a 9 stop difference.
-Shoot the required number of shots at your desired interval. In our above example, take nine shots 1 EV apart or 4-5 shots 2 EV apart (sometimes even with a 9 stop difference as above you can cover with a three shot sequence at 0, +2, and -2 EV)
-Use AEB to capture the full range for increased efficiency.
-First shot determines the starting point of the full DR captured with your series of shots
-In the example above (highlights at 1/8000 and shadows at 1/15,) full stops between are shown below. 1/500 is the center point of the dynamic range. Only whole stop increments are depicted. Each green bar shows one shot and the associated range.


-We arrive at the efficient method by shooting our first shot in the middle of the range and then shooting two addition images at +2 and -2 EV. New Nikons will need to shoot 5 images at the max 1 EV spacing to generate the 9 stops of usable data.
-Biasing the initial capture EV will skew the range as well.

-AEB may be used in series to expand range even further
-For example take first 3 shots at -2, -4, and 0 take second three shots at +2, +4, and 0
-Total range will be 13 stops of data (-4 to +4 = 8 stops plus 2.5 usable at each end.)


Part 3 next week.


Fiat Lux!

"Hey Hal?" Lightroom Photomatix Pro Plug In

We'll start a new regular feature on the blog today with the "Hey Hal?" series. This is a suggestion from one of the folks in class this week after noticing a common theme from the participants. Every now and again during the flow of class, a "Hey Hal?" will ring out letting me know there is a question. So today, I've taken a question from this week and the most common bug in the Photomatix Pro plugin for Lightroom.

When Tone Mapping is complete and you click Save and Re-import Photomatix will process the results and bring the image back into the LR catalog. If you clicked the stack with highlighted photo option, LR will stack the tone mapped, processed image with one of the source files. Every now and again the stack symbology will show up but the stack will not expand. This is a bug on the Mac and on Windows.

To regain full stack functionality, go to the Left Panel Folders Tab and click on the folder that contains the stacked images. When you highlight the folder, the stack will work properly.

Fiat Lux!

Hal

Programming Custom User Settings for Canon DSLRs

One of the great features on the current Canon consumer and pro-sumer DSLRs is the inclusion of Custom User Settings on the Mode dial. You may have looked down at your Mode dial (the dial on the left side on top of the camera where we normally select M for Manual) and seen C1, C2, or C3 (if you have a 50D you will only see C1 and C2.)

The "C" options are programmable with just about every function on your camera. At LIGHT, we have found setting these custom modes is a huge benefit when shooting. When properly configured switching between shooting modes does not get any more effective or efficient.

LIGHT recommends setting the dials as follows (this is, of course, our recommendation and your own settings may vary)

C1 = Portrait. We consider "portrait" to be a broad category when we the shooter and the target, make that subject (old fighter pilot habits sometimes die hard) are both stationary. This applies to actual portraits, landscape, sea scape, macro, etc.

C2 = Action. We define action as either shooter, subject, or both in motion.

C3 = HDR Auto Exposure Bracket. We use the bread and butter setting of 3 shots 2 E.V. apart.

(Since 50D shooters do not have C3, LIGHT recommends setting C1 to Action and C2 to HDR. The normal M setting is used for "portrait.")

It is fairly straightforward to set the custom user settings. LIGHT offers the following initial parameters. We will assume shooting RAW.

To set the C1 custom user setting. Switch the camera to Manual mode by turning the dial to M. Once in Manual, set the following:
-Evaluative Metering
-Auto White Balance (remember the custom mode is a baseline, you may switch if desired later.)
-One shot auto focus (AF)
-Single shot drive mode
-ISO 100
-Aperture = f/8 This is a baseline. You will, most likely, need to change aperture based upon your desired depth of field and shutter speed requirements.
-Shutter Speed = 1/250 This is a starting point. You will, most likely, need to change shutter speed to reach the desired exposure.
-Select center AF point
-Quality = RAW
-Color Space = Adobe RGB
-Picture Style = Neutral

Once the camera is configured per above (or with your own desired settings) do the following:
-Push Menu
-Navigate to the last "yellow" menu and highlight "Camera User Setting"
-Push the Set button inside the secondary control dial
-Highlight Register and push Set
-Highlight Mode dial : C1 and push Set
-Highlight OK and push Set

To set the C2 custom user setting we must first discuss how you shoot Action. If you are a Manual shooter set the modedial to M. If you are an Aperture priority shooter consider switching to Manual in the future and set the mode dial to Av.

Once in either M or Av set the parameters as above with the following changes.
-AI Servo AF
-Continuous or Continuous High drive mode
-Aperture = set maximum aperture (when configuring this C2 setting LIGHT recommends attaching your fastest lens so any other lens will always be at maximum aperture. For example, LIGHT's fastest lens is f/1.4 so our C2 default is 1.4. If you subsequently put a slower lens on it will default to it's maximum aperture.
-Shuter speed = 1/500 This is again a starting point.
-ISO = 1oo but consideration may be given to increasing to 200 to generate faster shutter speeds in lower light conditions.

Once the camera is configured per above, follow the same procedures as above when setting C1 with the exception of highlight C2 this time.

To set the C3 custom user setting set the mode dial to Manual. Configure exactly as C1 with the following exceptions.
-Continuous or continuous high drive mode.
-Enable Auto Exposure Bracketing (AEB) by pushing menu and navigating to the second "red" menu. Highlight Expo.comp./AEB and hit the set button. Move either the primary or secondary control dial (camera dependent) until the ticks are at -2 and +2. Hit the Set button.

Once the camera is configured per above, follow the same procedures as above when setting C1 and C2 with the exception of highlight C3 this time.

With all three custom user settings configured you are now just a quick mode dial turn or two away from rapidly swiching from portrait to action to HDR.

How about that for effective and efficient?

Fiat Lux!

Hal

Interesting Chandelier


An interesting image from yesterday's shoot at the Madonna Inn, San Luis Obispo, CA.
The shot is a 5 component HDR taken from the floor directly underneath a fun chandelier. I was testing the new Benro travel tripod with the Really Right Stuff BH-55, great support system. I'll have a detailed review of the tripod up soonest.
I imported to Lightroom, prepped tone curve and sharpening settings, and then exported to Photomatix Pro. After a quick tone mapping using the details enhancer I processed and reimported to Lightroom. To keep it interesting I sent the image to Photoshop to add some creative high radius low amount sharpening to the image. Upon return to LR I adjusted the vibrance a little.
Thought it was an interesting shape and form exercise. I think the image is ultimately destined for a huge black and white canvas. I included a slightly higher res picture so you could zoom in and see some of the detail.
Check back soon. Next post will be directions to set up the custom settings on your Canon camera's mode dial.
Fiat Lux!

Class Shooting at Madonna


A quick shot of part of the class shooting interior HDR at Madonna Inn in San Luis Obispo. I've found that a terrific way to master the theory and practice of shooting for high dynamic range source images is to shoot in a dark room with windows. The dynamic range typically exceeds the cookie cutter 3-shot standard (0, -2, and +2) forcing the photographer to shoot series of 3-shots using exposure compensation. A tremendous learning experience.

One of the students shot a 3 segment panorama with 6 component HDR images each this afternoon. During night lab he smoothly merged the components, tonemapped, and easily photomerged the resultant TIFFs into a beautiful interior HDR Pano! Nice work!

Fiat Lux!

Hal

We'll be shooting outside tomorrow to practice some more.

HDR Guidelines Part 1

The following post is some basic guidelines for shooting HDR source material. Parts 2 and 3 will be up in the next couple of days. Enjoy and shoot well.


High Dynamic Range Considerations - Bull's Guidelines

Shooting a scene with a dynamic range (DR) exceeding the capability of your sensor will either leave you with blown highlights or no shadow detail. Shooting multiple images to overcome the limitations of your sensor may, with sound processing, give you good highlights and shadow detail. When shooting multiple images try to ensure the exact same composition for each shot (to ensure optimum processing each pixel should match exactly!)

Different situations require more or less stability. For example, a series of bracketed shots taken with camera auto exposure bracketing (AEB) functionality and high shutter speeds may be hand held. For more challenging situations a sound tripod and ball head optimized as below will create a better series of source files.

-Use a STABLE tripod and head (a poor tripod is the number one equipment issue seen here at LIGHT.) The following tips may help make the tripod more stable.
-Lower legs
-Lower center column all the way and lock down
-Hang a weight
-Remove camera strap

Once the camera is firmly attached to the tripod via a good ballhead (Really Right Stuff BH-40 or BH-55) the following may also help reduce vibrations.
-Mirror lockup (more on mirror lockup's efficiency or lack thereof later)
-Cable or wireless release
-If no release, use the camera’s self timer
Part 2 soon.
Fiat Lux!

Jim DiVitale's Workshop is Incredible!

Today Jim started his The Creative Process of Fine Art Montage workshop here at LIGHT. We were able to get enough coffee and doughnuts to maintain some focus on his powerful techniques on creating his montage work.

Lots of blend modes, lots of masking and lots of creative brainstorming!

We learned to make our own custom brushes and lots of keyboard shortcuts to make the process go a lot smoother.

Jim gave us files to work off of to see how we would interpret what he had already finished for his commercial work.

Here is an example of our second hand-on work folder. 5 different images all combined using primarily the Overlay, Soft Light and Lighten blend modes.
You can see his version of this on his website gallery 2, only his version is more blue.
We will be learning how to do Displacement first thing in the morning and then how to do a few other tips and tricks he has waiting up his sleeve. This is a very Savvy class this weekend. Everyone seems to be on the same page. Great group, great instructor and some great doughnuts.
Tonight, Hal is a defending champion at the Paso Robles Wine Maker's BBQ Cook-off, assisted by Rich Hartenberger the wine maker at Midnight Cellars. Filet-wrapped Bacon and a port, triple chocolate, bacon and sea-salt finish brownie. Good luck boys!

36 Shot HDR Panorama

"Secret Beach" Maui
Canon 5D Mk II, EF 24-70mm f/2.8L, Induro C213, RRS BH-55, PCL-1, and Slide

Another image from our Maui workshop last week. This one is a 36 shot high dynamic range (HDR) stitched panorama. I split the scene into 12 segments and fired off three shots of 0, -2, and +2 EV for each segment.
I imported the Canon 5D Mk II RAW files into Lightroom and prepped them for Photomatix Pro by turning the Tone Curve to Linear and setting the sharpening amount to 0. I would normally export the files to a working folder and batch process with Photomatix Pro for speed. I wanted to see how long it would take to export each segment's HDR components via the Lightroom plug-in for comparison. After I sent the first three components and decided upon Photomatix Pro Details Enhancer settings, I saved a preset. Not necessarily required since the Details Enhancer has sticky settings (they will stay as you last had them.) This is a preference and can be changed so that the settings return to the default each time you tone map. We do not recommend this, keep them sticky!
I continued through all of the remaining images saving the output as a 16-bit TIFF. Expecting a brutal stitch from Photoshop I changed PS's performance preferences and reduced the amount of RAM devoted to PS to about 45%. Strangely, this actually improves PS performance for big panos. The discussion as to why goes a bit beyond the post; I'll re-engage on that one soon.
The 12 TIFFs stitched flawlessly. Of course, it really helped that I followed all the rules with this one most importantly I located the EF 24-70mm f/2.8L's entrance pupil and aligned it with my tiripod's axis of rotation (using the Really Right Stuff PCL-1 and "Nodal" slide.)
I added a bit of contrast and removed a pesky swimmer.
Hope to see you here soon.
Fiat Lux!
Hal

Free Live Web Training Every Week only at LIGHT!

As many of you know we started live online training a few months ago in the format of Monday Night Light (MNL.) The intent was MNL would be just like your favorite TV show; scheduled regularly so you can tune in each week.

The seminars have been great and we are expanding the program with one change, every session of MNL is FREE, no catch, no hidden costs. All you need to do is sign up and tune in.

Every Thursday evening or Friday morning we will post the new link here on the LIGHT blog, via Twitter, and on our Facebook page (Light Photographic Workshops.) The sessions are limited to 1000 attendees so register early.

For the Twitter crowd follow LIGHT at www.twitter.com/LightWorkshops.

Click on the following link to register. After you register you will receive a confirmation email as well as reminders one day and one hour before the event.

https://www1.gotomeeting.com/register/154307416

Hope to see you online next Monday!

OBTW, next week's topic is creating an action to automate your luminance mask creation.

Fiat Lux!

Hal

Last Day Here in Maui


Going to spend our last day here in Maui on the beach. Time to relax. Relax, that is, until Monday Night Light broadcasts live from the Insitute of Visual Arts at 6:30 PM PDT.

Visited a small, verdant valley on the west side of Maui yesterday afternoon. We shot some amazing portraits and figure work in and around a cool little stream. Incredible shooting for Randy, V, and me.

Will update again later today. Look for new courses posted this week at www.lightworkshops.com/

Aloha!
Fiat Lux!

Hal

Interesting HDR Shot


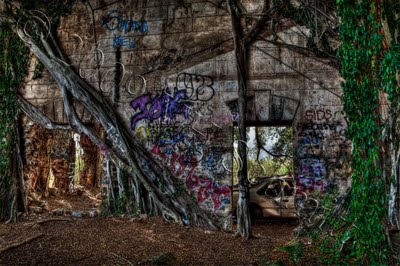
A 6 shot HDR from Maui. Very interesting location with an old sugar mill completely taken over by a tree; an unreal location crossed between history, spray paint, and nature.

I shot the images with a Canon 5d Mk II, Canon EF 24-70mm f/2.8L, Induro C213, and RRS BH-55.

I am not sponsored by the Induro tripod brand but their product is very, very good at an incredible cost. The competition is Gitzo who make a very nice tripod. Unfortunately, Gitzo charges over $800 for the tripod I have at around $350. No comparison!

The money you save on an Induro tripod will allow you to purchase the best camera support gear on the planet. Really Right Stuff gear is totally bombproof. Worth every single penny.

Heading back to Cali Monday evening. Just in time for another few courses, Fine Art Montage with Jim Divitale, HDR Intensive at LIGHT, Photoshop 2, and Total Workflow in Lightroom.

We also must dominate the annual Paso Robles Winemakers' Barbeque Cook-Off Saturday the 8th of August. As many of you know we at Midnight Cellars and Volatus are the defending champions and are about to tear it up again with a filet wrapped bacon. Yes, you read it correctly. Thick bacon cooked perfectly wrapped in killer, thin-sliced fillet mignon grilled to perfection and delicately covered in a 24 hour reduction of red wine, stock, and veg. Did I mention the double chocolate, port infused brownies for dessert?

Fiat Lux!

Hal