Epic Light Gallery Opening Ceremony

Tonight was an "Epic" night of photography, wine, good friends, and great fun.

The Official SLO Chamber Ribbon Cutting!

Thank you Amanda (second to left) for hanging the ENTIRE gallery!

Light Photographic Workshops celebrated our opening of Epic Light Gallery tonight with a great turn out of local photographers, students and photography/art afficionados -as well as our students participating in Jennifer Wu's workshop this week!

Hal Schmitt giving his intro to the gallery and school

Bob Canepa showing his work to Jennifer Wu

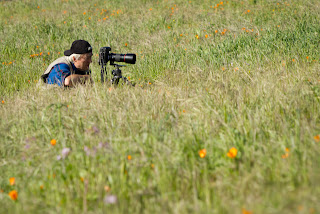
Mike Baird and his lovely Wife

Thank you To SLO Chamber for joining us and presenting us with their ribbon cutting ceremony to help us become an official part of the SLO Chamber. You will be able to see the ribbon cutting photo posted on their website within the week.
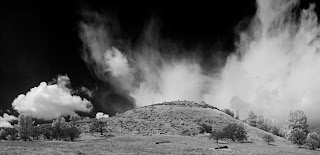
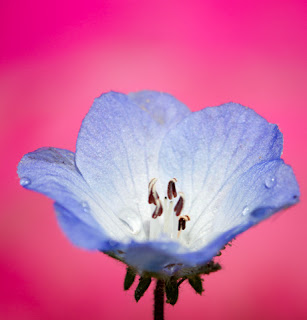
Bob Canepa

Mike Baird and Dan O'Donnell

We launched our gallery with two incredible local guest photographers in the area, Mike Baird and Bob Canepa. Bob brought framed prints and Mike went the "technology" route with a slide show on his brand new HD TV screen with Cd's of the images for sale and 2 gallery wrapped canvases printed by Light.

We had live music performed by local singer/songwriter Reese Galido http://www.reesegalido.com/ .  Reese will be joining us again next month for our showing with her stand-up bass player who compliments her style of music beautifully.

We, of course, had to have wine and cheese! Volatus 2005 was debuted at this wonderful event as well! Volatus 2005 will be labeled early April and will be available for $30 a bottle through Light and a few select carriers in the area.

Fiat Lux!

Day 1 of our Wildflower Intensive

The fully laden bee butt shot.

Another great day at Light.  Hal's Wildflower Intensive is in full swing.  We spent the morning in the studio, gallery, and around the school perfecting our techniques of live view, expanded depth of field, flash, multi flash, reflector, diffuser, and more.

After a quick break we took off for a few acres of poppies.  Weather cooperated beautifully with full sun, blue sky, and cool (but light breezes.)

Deep cover.

Five and a half hours in the field with the flowers was incredible photography.  Off early tomorrow morning to do it all again with different subject matter (ok, I'll probably sneak a few poppies in.)

Fiat Lux!

Poppies are Here

Happy as a bee in pollen (a little more blog friendly than the other expression.)

Out scouting again today and found huge fields of poppies.  I am always impressed by the intensity of the orange.  I am always underwhelmed by the sRGB conversion for web.  Hope to see you out here for a wildlfower excursion. 

All shots today were handheld with a Canon 5D and EF 180mm f/3.5L macro. 

Fiat Lux!

Welcome to Wildflower Season

Out scouting today to locate the first wave of wildflowers.  The storms of the weekend parted just as we, Reagan and I, began some quick shooting.  We visited a huge area so we only took a shot or two here and there.  Cannot wait to get out there and do it right with tripod, live view, flash, multi flash, diffuser, reflector, and more.

Looks like a good start to the season. 

Had to add an 8 shot IR pano as well.

Fiat Lux!

Hard to find pink out there so I had my daughter put her foot behind the flower.

Fun use of pink rain boots!

2011 California Photo Fest Site and Registration are Live!

Black Hill sunrise pano!  Come shoot it with us!

The 2011 California Photo Festival site, schedule, and registration are up and live! 

We have assembled a group of 17 talented instructors, over 170 courses, and some really cool events.  Even though it's live, we will continue to add instructors, courses, sponsors, and more as we get closer to the fest.  Our goal is to make this the best photography and digital imaging immersion available anywhere.

Follow the link below and check it out.  I will warn you, block off an hour or so to check out all of the classes.

2011 California Photo Festival

When you register you will create an account and then build your schedule.  At any time you can log back in and modify your schedule as desired.  Hopefully, a tremendous improvement over last year.

Fiat Lux!

Hal

Magic of Wildflowers with Rob Sheppard now only $595!

Rob Sheppard is coming back to Light April 11-15, 2011 to teach you everything you need to know about creating beautiful and unique photographs of the Central Coast wildflower bloom!

We've just lowered the price for our Magic of Wildflowers workshop from $895 to just $595!

This class is one of our favorites and now we're offering it for a killer deal. This offer is only good for 1 week, so get your spot before March 18th!

You can register online at LIGHTWorkshops.com or call the office 805-528-7385.

Fiat Lux!

A Day in the Life

A quick slideshow of images from one day's shooting up in Alaska.  Pretty amazing the different subjects, lighting, techniques, and more you can encounter in one day. 

Shot with the  Canon 1D, 5D Mk II, and 7D with lenses from the EF 15mm f/2.8 fisheye to the EF 800mm f/5.6L.  Slideshow from Lightroom with music from Victoria.

You should join me up there sometime!

Fiat Lux

Hal

Embrace the Group

As many of you know the power of Photoshop is found in the layer.  Taking that a little further, it is found in the combination of many layers to achieve just the look or design you are going for. 

Some users are hesitant at first but soon find themselves adding layer after layer in order to perfect an image.  As I walk around the classroom looking at people's work it is not unusual to find images with 25+ layers! 

With all those layers, things can get a little bit confused and cluttered.  We recommend two simple tips to help keep everything logical and organized.

A mess of layers.

1) Name every layer.  Of course, Photoshop does this for us but the auto generated layer names do not always tell us exactly what the layer is doing.  Try to name each layer with something simple that tells you immediately what the layer does for your image.  The simpler and more meaningful the better as you might revisit the image a day, a month, or a year in the future and will want to know quickly what each layer does. To rename a layer just double click on the current layer name and an editable text box will pop up.  If you happen to click in the wrong spot and the Layer Styles dialog opens, no worries.  Just close it and try again.

Layers with meaningul names but still cluttered.

2) Use groups!  Groups are like parent folders on your hard drive.  A parent folder may contain dozens of files.  When you want to see them all you expand the folder, when you don't collapse.  A group works the exact same way.)  When the layers start piling up see if there is a way to group them together.  For example, if you have five layers to optimize the sky put them into a group.  To create a group, highlight the layer or layers you want together and then position your mouse over any of the layer thumbnails.  Click, hold, and drag to the Group icon at the bottom of the Layers panel.  The group icon is the one that looks like a small folder.  It is the third from the right directly next to the create new layer icon.  Once you have a group remember to give it a meaningful name.  You can easily expand or collapse the group by clicking on the small triangle to the left of the group thumbnail (a folder icon.)

With properly named groups it is much more logical and organized.

You can have as many groups as you need or want.  Once you have a group you can also add  a layer mask to selectively reveal or conceal the effects of the entire group.

Try these two techniques and see if they help manage the possible confusion and clutter that comes with a multi layered document.

Fiat Lux!

Aurora Revisited and Cold Wx

After my disappointing aurora shoot last week, I decided to try again.  The goal was to modify the shots and try and make them interesting and have a little impact.  I tried three techniques.  Let me know if they worked.

Although there are limited foreground elements where I currently am (arctic tundra -think barren, frozen plain) I tried to align the aurora with a ground element.  I found this to add a little interest as it appears at first glance the aurora could be coming from the ground station. 

Second, I tried to fill the frame with the subject.  Negative space in the earlier images did not work. 

Finally, I am presenting the images as a series to show action/progression.  These four shots are taken in succession showing the initial contact through dissipation.  Much like a wave the shots progress from break to backwash.

I have been fortunate to see some amazing things in my life.  Last night was near the top (only outdone by the birth of my daughters.) The lights were incredibly strong for about three hours and visible from dusk to dawn.  OBTW, it was about -45 during the shoot. 

As I have previously discussed, the camera (5D Mk  II) did great in the cold weather.  Ambient temperature was about -16.  The battery was fine even though it had been cold soaked for about 36 hours previously.  The only issue I ran into last night was my tripod.  For the Benro travel angel temps below about -15 give it some issues, either freezing the joint "locks" or thermal contraction problems. 

For temps below about -25 the limiting factor on most SLRs is the LCD. In my experience, the back LCD goes first, then the top, and finally the viewfinder.

Fiat Lux!

Bull

Hal Schmitt is Coming to Las Vegas!

Hal is bringing his new seminar The Dynamic Duo: Lightroom 3 & Photoshop CS5 to Nevada!

In this one day event Hal will demonstrate the tips, tricks, and techniques of Lightroom revealing a streamlined but effective process to execute all stages of the digital workflow from import to output. Transitioning seamlessly from Lightroom to Photoshop (via the built-in functionality) Hal will demonstrate the beauty and power of the world’s finest image optimization software.

The course will be held at:

Morgan Stanley Smith Barney
701 North Green Valley Parkwa
Henderson, NV 89074
Admission is $50 at the door, but pre-register before March 11th and pay only $39! For more details call the office at 805-528-7385 or go online to LIGHTWorkshops.com

Fiat Lux!

Almost Eagle Time

Love the talon shadow on the right wing.
For my studio and speedlite/CLS crowd, light source hard or soft? And how do you know?

I was going through some older images this evening and that is when it hit me.  Eagle time is almost here.  I know it is still technically winter but Spring is right around the corner (although I would not guess it from the nippy -45 wind chill outside.)  With Spring on the way wildflowers and eagles cannot be far behind.  Time to break out and tune up the macros and super telephotos.

I am fortunate to photograph just about everything and I really get into it all, regardless of subject.  With that said, there is just something special about eagles. 

Hope you can join me to shoot some of Spring's offerings.

Fiat Lux!

When Boring Photos Attack!

A boring, uninteresting aurora shot.  Destined for the Recycle Bin.|
Just because it is a big stitched pano, does not make it interesting.

I am sure it would never happen to our readers here but every now and again I run across the dreaded "Boring Photos of Interesting Things" phenomenon. 

The more I think about it, it probably happens to everyone at some time in their photographic journey.  You have perhaps traveled around the world to an exotic location or maybe just stepped outside your front door to an amazing scene.  During the capture process, it seemed like everything went right.  We had the equipment, we knew the technique, and had a great subject in front of the lens.  After the fact looking at the images in Lightroom or Photoshop, something just is not right. 

When this happens there are a couple of great takeaways or lessons to be learned.  First and most important, go back to the basics and fundamentals of what makes a great image.  Where does the pop, the impact, or the wow factor really come from.  Strong composition and exposure will always start you off on the right track.  Ask yourself if you took the shot or if you made an image.

Second, try to remove yourself from the experience itself and concentrate on just the image.   Examine your effort with a critical eye and look at the image from a detached observer perspective.  We often have an emotional connection to our shots that do not allow this type of examination.  Pull back and view the image as if you were not the one who shot it.  Would you still be interested? 

Third, if possible, get rid of the image or at least bury it.  I understand that sometimes these images are all we have to remind us of a particular event, trip, or experience.  If I do not have a better capture, I will keep some of these around as mementos.  Most of the time, I just let them go.  I will learn from the experience and next time I will make an image.  

Off to the trash.

Here I have attached two recent unbelievably boring pictures of a really cool thing.  Like so many others I've shot, here are two bad aurora images.  It was great to experience but the images, for lack of a better word, suck.  As described above, I went back to the basics; both of these images have no real subject, no anchor, no foreground element, no real composition, no flow.  From a detached observer perspective, they are not interesting.

So these two shots make their debut and finale all at the same time. You'll find these images here and in my Recycle Bin for another few minutes before they go bye-bye.

Fiat Lux!

Tip of the Week: Using Color Lables in Adobe Lightroom and Bridge

One of the most overlooked features in Lightroom and Bridge is the Color Label. Both programs offer five colors (red, yellow, green, blue, and purple) to assist you in managing and organizing your images. These colors may be assigned a specific meaning in your workflow and when assigned to an image you will have a quick visual reference to your image "types."

To assign a Color Label in Lightroom, highlight an image or images, position the cursor over the image, and right click. From the flyout menu select "Set Color Label" and choose one of the colors. You may also use the keyboard shortcuts of 6 (Red,) 7 (Yellow,) 8 (Green,) or 9 (Blue.) Unfortunately, no keyboard shortcut for purple. In the Bridge, select just as above and then right click. At the bottom of the flyout menu choose "Label" and pick the appropriate option. You will notice there are no color names but instead text assigned to a color. To customize, go to Edit-Preferences (Win) or Bridge-Preferences (Mac) and select "Labels" from the menu. First uncheck the box at top to enable single stroke keyboard shortcuts the same as above then enter a meaningful description for each color.

You can use the Color Label anyway you prefer; as an example here is my system. Red = High Priority Yellow = Web Green = HDR Blue = Stitched Pano Purple = Expanded DOF

Join our newsletter to get more tips from the crew here at Light!

Fiat Lux!